If you’re reading this, you’re probably thinking about making a visual novel. That is, a videogame of the genre Visual Novel, subgenre of Interactive Fiction. It's important to define what this means, because it will give you a framework in which you can develop the game more easily.
For example, visual novels often tell a rich story aided by static visuals. There are many more rules and conventions of visual novels that you should familiarize yourself before starting to write such a game. Of course, you can bend, break and subverse these guidelines, but knowing them will help you write better games.
To make a visual novel with RenJS it doesn’t matter if you’ve never made a videogame before, or if you don't know any programming. As said above, one of the most important aspects of the genre is the story. RenJS lets you focus on it, by providing a way to use movie-script like text files and easily configurable visuals, to create the game you envision.
RenJS, broadly speaking, is a tool to help you make visual novels. You’ve probably heard about other game engines, like Unity or Game Maker. Those tools provide a whole environment for developing many kinds of games. RenJS is a bit different.
To build the games, you only need to create text files for story and visual configuration. There’s no program you have to install or open to make your game. RenJS is just a library that you import into an html file, that knows how to read a story and show it in a web browser.
To write the story and make up your visuals, you can use any tools you like and know already. Some great open source and free tools to use can be:
Brackets/Atom: for text processing. You can check this tutorial to setup atom editor.
Inkscape: for vectorial graphics (great to make GUI!).
Here's a sneak peek of the story script, from the Quickstart project.
	start:
	  - play morningBGM:
	  - show room: WITH FADE CONTINUE
	  - show deuzi: happy AT CENTER WITH FADE
	  - deuzi says: "Hello, welcome to (bold)the Quickstart!(end)"
	  - wait: 300
	  - deuzi says normal: "Are you ready to create great visual novels?"
	  - choice:
	    - "Yes!":
	      - deuzi says happy: "That's great! Go ahead!"
	    - "Not yet!":
	      - deuzi says: "Well, I'll be here when you're ready!"
	  - deuzi says normal: "If you're new, don't forget to play (bold)the Tutorial(end) game, where me and my friends will show you around the basic features of RenJS."
	  - deuzi says happy: "And if you already have some experience, you can go ahead and start writing!"
	  - scene: endGame
All of the story files are in a standard format called YAML, a human-readable data-serialization language. A key aspect of this language is that indentation is very important, as it marks the start and end of the different sections.
Indentation is the amount of spaces at the start of the line, before any text. You can choose between two or four whitespaces, or a tab character, but you can't mix between them once you decided on one.
In the script example above you can see the indentation at play. The first word, marking the name of the scene starts at zero level of indentation, and all the actions inside it are at level one. The choice action has a list of options inside (that will be displayed to the player to make a decision), and each is indented one extra level.Furthermore, each possible option in the action has inside a list of actions that will be played if the player chooses that path, and each of these actions are indented one more level.
The Tutorial
If this is your very first encounter with RenJS, you should play the Tutorial. This tutorial is a game made with RenJS itself, that showcases the most important features of RenJS.
To create a visual novel with RenJS, we're going to use many different elements to compose both the game and the story itself. When reading this documentation, you will find references to all of these concepts, so it's better to get familiar with them first.
Game elements
To make the game structure more easy to design, there are four main elements that compose it. These are:
Story
Setup
GUI
Configuration
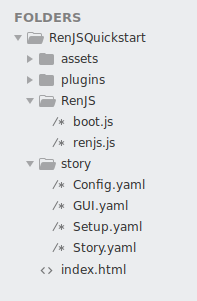
Each of these elements correspond normally to a file with the same name. If you check the Quickstart example, you will find them inside the story directory. The story is roughly speaking, the text of your story. A succession of actions such as displaying text and showing images. But before telling a story, you need to declare all of the story elements that compose it, such as locations, characters, etc. The setup is where you do this. The GUI, or Graphical User Interface is to define all the elemnts of the game that are not strictly part of the story, like menus and the Head Up Display. Finally, the configuration lets you set some important parameters for the story to look just as you want.
Story Elements
A story in a Visual Novel is told mostly through text and dialogue, just as any other story, but with the additional feature of visual support, hence the name. The text elements can be of two kinds, normal messages that will display inside a message box, and dialogue, that will also display the name of the character speaking inside another box, called the name box.
To help with structuring, the visual elements can belong to a specific category, each with their own way of appearing in the screen and properties. If you've played other Visual Novels, you're probably familiar with most or all of these elements already:
Backgrounds: A background is an image that normally stretches to occupy the whole screen, and will be shown behind all other elements.
CGs: CG stands for Computer Graphics, and it's a name given to any static image shown in the screen. These images can be placed anywhere on the screen and can be animated as a spritesheet and programatically (i.e. moving them, changing the alpha and scale).
Characters: The characters in a Visual Novel differ from a normal CG, because each one can have many images associated with it. Each of these images is called a look, and it normally represent a state of that character, such as emotional expressions, different outfits or body poses. Characters are not only a Visual element, since they can be made to talk.
The visual elements are related to the part of the story being told, so they will often appear, dissappear and change their position in the screen. The way in which they will show or hide is called a transition. Some examples of transitionsare:
CUT: Simply show or hide a visual element immediately.
FADE: Fade in or out a visual element by slowly making them transparent or solid. If changin from one image to another, the first one will disappear completely before the new one will start appearing.
FUSION: Similar to FADE, the new image will transition from transparent to solid on top of the old one, but without waiting for the old one to disappear.
FADETOBLACK and FADETOWHITE: A black or white overlay will cover the screen, then the image will be set behind it, and finally the overlay will disappear. The transition for the overlay will be a FADE transition.
MOVE: This transition is usen when you want to change the position of one visual element in the screen, and animate the movement.
Besides visual elements, music and sound is very important for setting the atmosphere of the story. In RenJS there are three types of audio elements:
BGM (Background music)
SFX (special effect)
BGS (Background sound)
Another big part of a Visual Novel is interactivity, by giving the player a list of options that they can choose from. In RenJS, there are two ways of doing that. Choices and interrupts. They both present the player with a list of options to choose from, that will make the story branch itself. The difference is that the choices will stop the game until the player interacts with them, while the interrupts will show in the screen, but the story will continue, and the player can choose or not to interact with them.
It is also possible to keep track of the player choices and use them to branch the story at any later point too. For example, a decision taken during the begining of the story could affect its ending. This brings the concept of variables, a way to store and read information, and logic operations that can compare these variables to make the story take different paths.
Story structure
Now that we know what elements can be inside a story, we can see how to organize them inside it. The story script is separated in scenes. Each scene contains a list of actions, and each action is related to any of the previously mentioned story elements. This is a list of the main actions that can be used in the story script:
Say and Text: Display text, word for word, in a message box, and wait for the player to click to continue with the story. A say action will also show the name of the character inside a name box.
Show and Hide: Show or hide a visual element with a transition. Optionally, it can take a position where to show it, and in the case of the characters, which look to show.
Animate: Only valid for CGs, it can animate programatically properties like position, alpha and rotation, or start a spritesheet animation, or a combination of both.
Play and stop: Play and stop music and SFX.
Choice and interrupt: Display a list of options for the player to choose from. Each option will have a list of actions to execute if it's chosen.
Variables: This action allows for storing information with key value. Variables can be read with its key, for logic and arithmetical operations and to display them in text, by using curly braces.
If and Else: This action contains a condition and list of actions that will be executed if the condition is true. It can optionally be followed by an else action containing a list of actions to execute if the condition is false.
Scene: Start another scene. You would normally use this action at the end of the current scene, for advancing the story, but it can be called at any point, for example, inside a choice or an if, to branch the story.
Wait time or click: Simply wait for a moment before continuing with the story, or force the player to click to continue.
Effects and ambients: Special effects, both visual and auditory. The different between them is that effects are a one off thing (e.g. a thunder flashing in the screen with its corresponding SFX and screen shake), while the ambients perdure over time until you remove them (e.g. a rain effect with particles falling and a rain BGS).
Call: RenJS allows you to add whatever custom action you might need in your story alongside the ones listed above. The call action will execute a javascript function in a plugin, and it will also send any parameters that you want. Inside this function you can use any of the game elements used by RenJS, for example, the visual elements currently showing, and all the variables created by the story. And since RenJS is based on PhaserJS, all of its API is available to add new graphical elements, and even create minigames.
Files Structure
RenJS games falls into the multiplatform HTML5/Web category. This means they will run as a web page in a browser. The multiplatform part comes from the fact that most devices nowadays can run an internet browser, like any computer and most mobile phones and tablets.
The game, then, is made up of a webpage, the RenJS library, and all the story assets, such as the story text and configuration and the images and audio files.
The Quickstart is a minimal game that comes with all of the necesary files, organized so that it will be easier for you to start writing. Let's use this project as an example to explore the required files.
What you should find inside the Quickstart directory.
Index File
The index file is located at the root of the directory, and it's the starting execution point of the game. When this file is loaded in the browser, it will load the RenJS library (renjs.js) and boot.js file, that will give it some instructions on how to create the game. Both of these files are located in a directory called RenJS.
You can see that not much else is happening in this file. In this case, the game will create a new canvas object and add it to the document's body. If you want to use a specific canvas element, you can create it and then specify its id in the Boot file.
Boot File
The boot file contains very elementary information for the game to start correctly, even before the story itself is loaded. For example, to create the game, it will need to know the screen resolution, and how to set up a very basic loading page.
This file is in the javascript language. You don't need to know any programming, but it's important to look at the RenJSConfig object and check what parameters have to be changed to conform to your game. Let's explore each of the options that we can define here:
Name: The name of your game.
H and W: The height and width of the game canvas.
Background Color: By changing the background color you ensure all FADETOBLACK transitions, including those between the menus and game, will be to this background color, instead of pure black.
Parent: You can start the game inside a particular html5 element, identified as the parent with this option. You need to add the element with the particular id to the index.html file.
Renderer and Scale Mode: These two parameters are related to the Phaser game creation.
Debug Mode: The debug mode lets you see a log of each action as its executed, and how it was parsed in the browser console (open with F12). This is useful in general when you're developping, and it allows you to find bugs in the story text very easily.
Loading Screen: The loading screen for the game, that will be shown while downloading the resources and setting up the game. It can have a background and a loading bar that will fill up, from left to right, as the game is loaded. The loading bar is a spritesheet with one (full bar) or two frames (empty and full bar), and it will be placed at the x and y pixel location indicated in this configuration.
Fonts: To be able to use different webfonts in the game, they have to be loaded as css. This parameter points to this file in the assets directory.
GUI Config, Story Config and Story Setup: Where to find these key story files.
Story Text: This parameter is a list of files that will contain the scenes of the story. In this case, and for short games, you can have everything in a single file. But as the story grows, keeping the story separated in different files is a great way to organize your writing.
Story Setup
The story setup contains all the references to the visual and audio story elements, contained in one YAML file. During the story, you will not be referencing images and audio files directly, but a key associated with them into this setup file. In this way, you can create your story using placeholder assets, that you can later change.
In this file you can also setup lazy loading for the game, in case you want to use this feature.
Backgrounds
The backgrounds are usually static images, so the only parameter you need to add, besides the key name, is the file location (normally inside the assets directory). The key names have to be unique and can't have white spaces or dashes, but underscores are allowed.
After the backgrounds tag, three backgrounds are declared with key name and file.
Characters
The characters are declared under the characters tag, with an unique key name and a few parameters:
Display Name: The display name is the name that will be shown in the name box when the character speaks. If this property is omited, the key name will be used as the display name, but contrary to the key name, the display name can have whitespaces and special characters such as accents and dashes.
Color: A color associated with this character, that will be used for the text color when displaying the name.
Voice: A short sfx that will be played when the character is speaking. This audio file has to be declared under the sfx section, and referenced here by tag name.
Name Box: The id of the name box to use to display this character's name, other than 'default'.
Message Box: The id of the message box to use to display the text when this character is talking, other than 'default'.
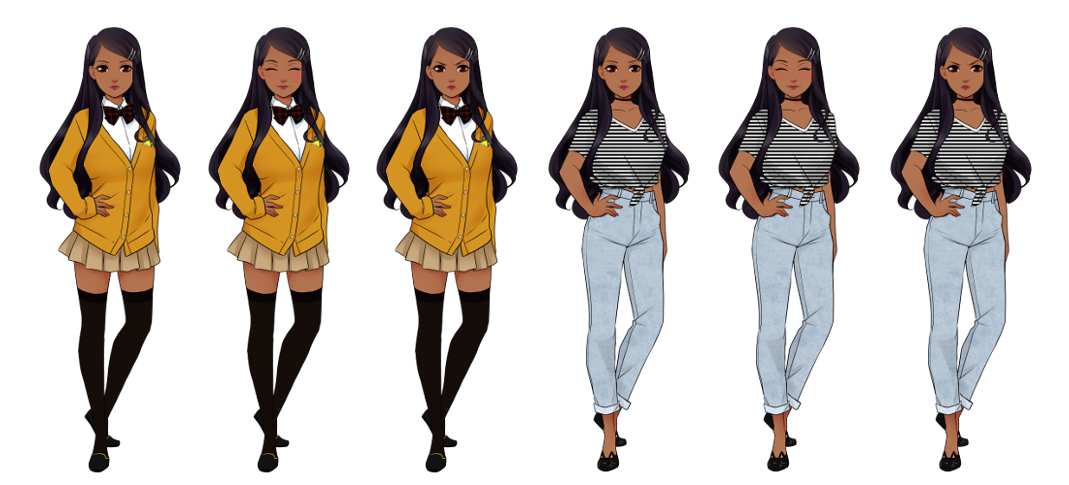
Looks: A character can be shown in many different ways, in particular, to show different emotions, body poses or costumes. The looks property is a list of images that should include all the ways your character can look throughout the game. Each look has a key name and an image file path. As with all key names, the look identifiers have to be unique for the character (but can be re used for a different character, i.e. two characters can have the look 'happy'), and can't have whitespaces or dashes.
Portraits (also known as side images): The portraits property is similar to the looks, but these images will be shown when the character is speaking, normally inside the message box (the message box needs to be configured for this). When a character has portraits configured, the say actions that include a 'look' key, will be used to choose what portrait to use.
In the code above, two characters are declared, each with six different looks. The character 'deuzi' has three portraits to use along with the dialogue, and it's configured to use a special text box that includes a portrait.
The different looks of the character deuzi.
CGs
The CGs (Computer Graphics) are images that can be displayed and animated. CGs can be a static image or a spritesheet. A spritesheet is a single image that contains all the frames of one or more animations.
As with the other elements, the cgs tag starts the section where the cgs are declared, each with unique key name. If the cgs is static, only the file information is needed. If it's a spritesheet, it needs not only the file, but also the frame size inside the image, and a list of all the animations that it contains.
The animations are declared with a key name, and are defined by their start and end frames, and the framerate. The frames inside a spritesheet are numbered starting with zero, and counting all the frames that fit inside the image, by going from the top left corner to the bottom right one.
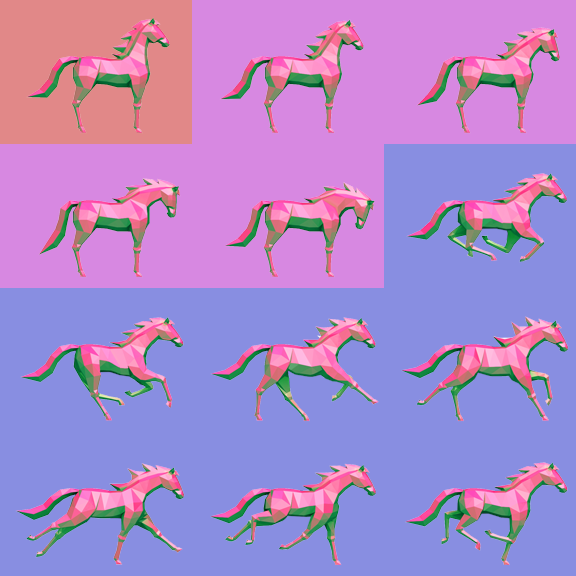
In this example, there are two static cgs called phone1 and phone2, and one spritesheet cgs called horse.
The spritesheet contains frames of 192x144 pixels, and two animations:
head:With the frames 1 to 4, and a framerate of 20 fps.
run:With the frames 5 to 11, and a framerate of 20 fps.
The first frame, with number zero, represents the normal state of the cgs.
The spritesheet with the animations color coded. First frame, or normal view, in orange; head animation in pink and run animation in blue.
Audio
The audio for the game can be declared under two different tags, music and sfx. The only information needed for these elements is key name and file, and the file should be in a web friendly audio format, such as mp3 or ogg. The difference between music and sfx is how they will be treated when playing them: Music will be looped by default, and sfx only played once.
Here we declare two background music elements, and two sound effects corresponding to ringtones.
Extra assets
Any other asset (images, audio, spritesheets, etc) you need for your game, that don't enter in the previous categories can be declared here. Why would you need extra resources? One of the usual cases is to use paired with the ambient and effect actions. For example, the RAIN ambient needs a water drop image to use for the particles, and a looping background sound. Another action that normally needs extra assets is the call action, that allows you to execute plain javascript code. If you were to show images or play sounds, you can declare them here and when the code will be executed they assets will be preloaded.
Since the extra assets can be of many types, this section is further indexed by the types of assets you're declaring:
image: Declare static images under this tag, with key name and file.
audio: For audio files of any kind.
spritesheets: Besides the key and the file name, the spritesheet needs two numbers that for the height and width of each of the frames it contains.
scripts: You can load javascript files that will be added to the page, instead of including them into the index file.
After the extra tag, we load a few assets of each category.
Configuration
The Story Configuration lets you set up many parameters and special values to use in the story. All of these values are inside a single YAML file (normally Config.yaml), that has to be pointed at from the boot file, just like the Setup file.
Special Positions
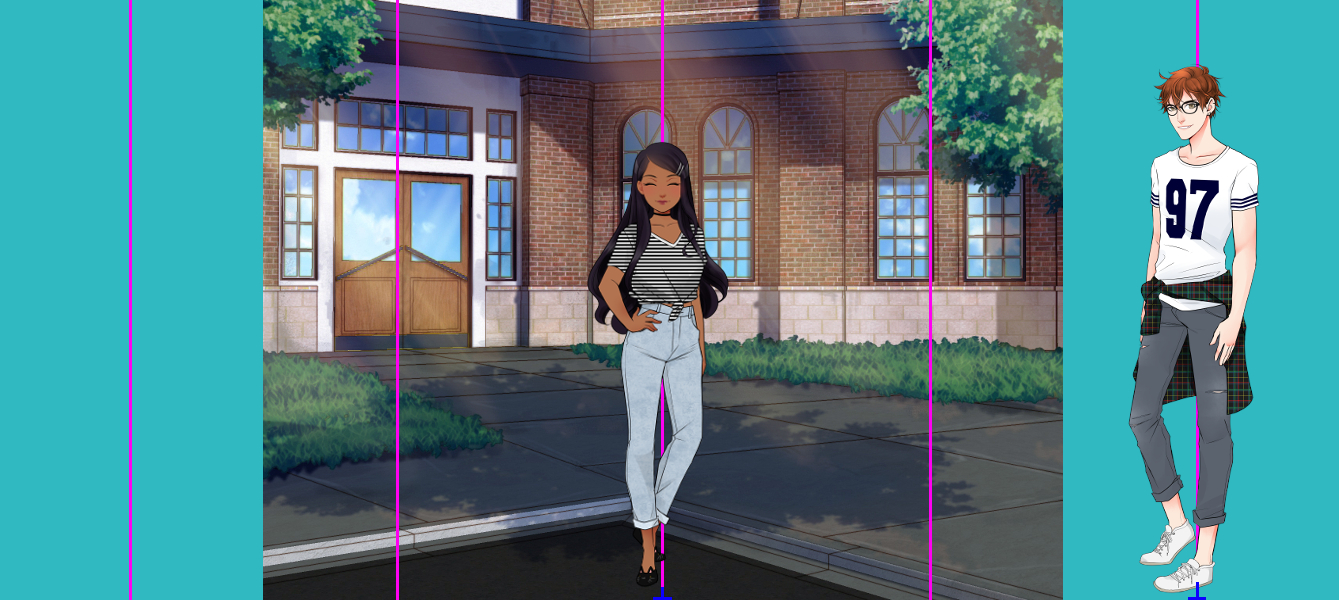
When showing characters, you can use the keyword AT to specify where in the screen they will appear. The character looks, that is the images that represent them, are anchored from its bottom center, so the pixel coordinates in the screen have to be chosen to coincide with this point. Normally, images are anchored from its top left corner, but since we'll want most characters to align from their feet, this change of anchor makes things easier.
The special positions in the Quickstart and Tutorial, marked with a pink line. The characters anchor point is marked in blue, Deuzi is in CENTER, Jair in OUTRIGHT.
Since the characters will be shown roughly in the same positions througout the game, it's possible to define a list of special positions that can be referenced by name, after the keyword AT in a show action. This is done in the configuration file, under the positions tag.
You can define as many special positions as you want. If you have a DEFAULT position, it will be used when the position is not specified.
positions:
  DEFAULT:
    x: 400
    y: 600
  OUTLEFT: #Outside of the screen, left side
    x: -133
    y: 600 #The y should be at the bottom of the screen
  LEFT:
    x: 133
    y: 600
  CENTER:
    x: 400
    y: 600
  RIGHT:
    x: 666
    y: 600
  OUTRIGHT: #Outside of the screen, right side
    x: 933
    y: 600
In the Quickstart example, there are five different positions, and the DEFAULT is the same as the CENTER. The screen resolution for this game is 800x600 pixels, and since we want the character's feet to be at the very bottom of the screen, the y coordinate is 600 for all the options. The positions OUTLEFT and OUTRIGHT are outside the screen, when showing characters in these positions, they will not really appear, but they're useful for simulating a character entering from the sides of the screen.
Default Transitions
A transition is the way in which a image will be shown, hidden or exchanged for another one. The most usual transitions are CUT, that will simply show or hide the image at once, and FADE, that will make appear or dissappear slowly by changing the transparency of the image, but there are a few others. Check the whole list of transitions here.
When using the actions show or hide, you can specify a transition to use, by using the keyword WITH. If the transition is not specified, the default transition defined in this section, under the defaults tag, will be used.
When characters talk, by using the say action, they can also change their look. In this case, the transition can't be specified in the action itself, and it will always use the one defined here under the say tag.
It's also possible to set here what transitions to use for showing/hiding choices, both text and visual choices, and the game menus.
Another important option to define about the transitions is if the player can skip them. When the option skippable is set to true, if the player clicks in the middle of a transition, the transition will jump to the end. This was the default behaviour in the first version of RenJS, but now you can opt out of it.
transitions:
  defaults: # Default transition when showing/hiding
    characters: FADE
    backgrounds: FADE
    cgs: FADE
    music: FADE
  say: CUT #How to change character expression in say action
  # Transition to use when showing/hiding choices
  visualChoices: FADE
  textChoices: CUT
  menus: FADE
  # Transitions can be skipped by the player by tapping
  skippable: false
In this example, the default transitions for all visual elements will be FADE, but when using the say action, the character looks will change immediately with a CUT transition. The visual choices and the menus will be faded into the screen, but the text choices (along with their boxes) will be shown with CUT.
Timers
The timers section lets you tweak the waiting time for:.
Fade time: How much it will take, in miliseconds, to complete the FADE transition. If fading in and out at the same time (changing one image for the other) the total time will not change, but each part will take about half the defined time.
Auto time: In automatic mode, the game will advance on its own. The story actions that require the attention of the player, like text and say will remain in place for a while, so that they can be read. How much time it will wait is defined here, in miliseconds. If you want the auto mode to go faster, this number should be lower.
Skip time: Skip mode is roughly the same as auto mode, but very fast.
Timeout: When doing a wait action, if the time is not specified, this value will be used.
	# Fade transition time, in miliseconds
	fadetime : 750
	# Time in each action that waits (e.g. text and say) when skipping
	skiptime: 50
	# Time in each action that waits (e.g. text and say) when auto playing
	autotime: 150
	# Default waiting time for timeouts if not specified
	timeout: 5000
Logs
Two features can be used optionally by setting these two properties:
Log choices: This features keeps track of all the player decisions when facing a choice action. When replaying the game, the choice boxes of the previously taken paths will be tinted, and more easily identifiable. If you don't want to use this feature in your game, set the property logChoices to false.
Log text: This feature keeps track of all the say and text the player has seen, no matter the different paths they could have taken, and allows them to read them again. The text will be shown again in the message box, and the game will be paused until reaching the most recent action. For this feature to work, the HUD needs to have the buttons for navigating the log (show previous log message, show next log message, go to last log message).
	# If logChoices is true, previously chosen choices will be shown in a different color
	logChoices: true
	# If logText is true, all executed say and text actions will be kept in a log that can be checked
	logText: true
Punctuation Wait
The message box shows the message text by adding characters one by one. The time between each character is uniform, and defined by the speedText user preference. For dramatic effect, sometimes we want to wait extra time when certain characters are encountered, usually punctuation marks such as dots, commas, ellipsis, etc.
Punctuation Marks: A list of all the punctuation marks that will have an extra wait time.
Punctuation Wait: How much, relative to the normal text speed, will be waited until the next character appears after a punctuation mark. For example, a punctuationWait equal to five means that when a punctuation mark is added to the message box, it will wait 5x times what it waits to add a new character.
When the message box has a sound effect associated with it (or a character voice), you can change how the sfx will be played. The Characters per sfx defines how many characters will be placed in the message box before playing the sfx. Normally, if your sfx is very short, you'll want to play it every time a character is added. For longer sfx, you can set this number higher to skip a few characters between sounds. The first character of a word (after punctuation marks or whitespaces) will always sound. You can set this property with the value auto to calculate automatically this value related to the sfx lenght and the text speed. If you want to play the sfx only once when the message box appears, you can set this property as -1.
punctuationMarks: [".",",","!","?","-"]
# when a punctuation mark is shown, X extra puntuation wait times will be spent after adding the next character
# the total amount of wait will be this value multiplied the text speed
punctuationWait: 5
# how the message box sfx will sound
charPerSfx: 1
Lazy Loading
Normally, when you want to play a RenJS Visual Novel, the first step is to load the entire game into the webpage. When loading the assets (setup in this same Setup.yaml file), the player will see a loading screen that can include a bar showing the progress. For short and small games, this is not a problem, since the game will be loaded fairly quickly. But for long games with lots of assets in higher quality, the waiting time could become a problem.
The main idea of lazy loading is that the player can start playing the game before the whole game is really loaded. The assets will be loaded in batches, sorted by priority according to what the player needs to see next. In big games, where the player is expected to play in different session, the game will not need to load the totality of the assets, and the player will never see any difference.
In esence, what this module does is to delay the loading of the assets until the moment they are needed, grouping them by scene. Just as before, the player will see a loading screen while the assets are loaded. But this doesn't mean there will be a loading screen at the start of each scene. The assets have to be loaded just once, and they will be available for all subsequent scenes that need to use it. If all the assets used in a scene were loaded previously, then no loading screen is needed and the scene can start immediately.
The assets can be further grouped into episodes. That is, an episode is a group of scenes, that will all be loaded together at the same time. So when a scene from an episode starts, the assets from that scene, and from all the scenes in that episode will be loaded. This will effectively skip any loading phase for any other scene in the same episode.
To add lazy loading to your game you will need to setup a few things in Setup.yaml file. The main information needed is which assets will be used in each scene. This can be obtained directly from the story, but analyzing the whole script to do this extraction is costly. Furthermore, some assets, like the ones set in the extra section of the file, may be harder to find, since they could be used internally by Ambients, Effects or Plugins, without being explicitly written in the story. For these reasons, the first configuration under the lazy loading tag will be assetsPerScene, that will have, per each scene in the game, a list of the assets it needs.
To make things easy, when the option findAssets is set to true, the story script will be analysed in its entirety when loading the game, and the assets per scene list (minus the extra assets) will be printed in the console, ready to be copied and pasted into this setup. Extra assets should be added manually into the scenes that use them.
lazyloading:
  findAssets: true
assetsPerScene list printed in console when findAssets under lazyloading is set to true.
Another configurable parameter is backgroundLoading. To further minimize waiting time, this option starts loading further episodes in the background. This means that the player will see a loading screen for the first episode, and while playing it, the assets for the next one will start loading. When the player gets to the next episode, there is a possibility most or all of the assets for it will be already loaded. The benefit of this option will depend on the nature of the game you're writing. If the game is mostly linear, at least in the use of its assets, then this feature will save lots of waiting time. But if the game can take wildly different paths (again, in terms of assets) then predicting what asset will be used next won't be as easy, and the benefits of background loading will be minimal.
The GUI, or Graphic User Interface, is everything that is not strictly part of the story, like the menus and the HUD. The GUI is just as important for the story, since it sets the mood for the player even before she starts the game. There are many resources about how to choose the best interface for your game. There’s also a rich community of visual novel developers who create and distribute their own art and designs, sometimes as free creative commons assets.
To setup the GUI you need a configuration YAML file (identified as the guiConfig in the boot file). In this file, you will describe each part of the GUI. For example, a menu is usually composed of a background and a few buttons. In the file, you would have to write where to find the background image, same for the buttons, adding also where they should be located and what they do when clicked.
This configuration file can be done in two ways: you can write it manually, or using the RenJS GUIBuilder tool, that lets you create the file visually by dragging and dropping the components.
But before diving into the design, let's define exactly how is a GUI composed: Which components do we need, which menus are mandatory, etc.
Menus
A menu is a set of options presented to the player, to help them start the game, find information, change settings, or save and load the current game.
In RenJS, there's only one mandatory menu, the Main Menu. This menu is the first screen the players will see after the game is loaded, and it should allow them to (at least) start a new game. You can have as many other menus as you want, such as a Settings Menu or a Save and Load Menu.
Each menu is described as a list of elements, such as:
Buttons: The buttons have an event asociated to their interaction. This event can be, for example, starting a new game, changing the menu, loading a game, etc.
Images and Animations: Static or moving decorations that you can place anywhere on the menu.
Labels: Written text that you can place anywhere on the menu.
Background Music: An audio file that will play when the menu is opened.
Sliders: A component to set a numeric value to a property, for example, the music volume. Normally, you'll use this component on the Settings Menu.
Save/Load Slot: A thumbnail showing a screenshot of the saved game in that slot. A default image will be shown when the slot is empty.Normally, you'll use this component on the Save and Load Menu.
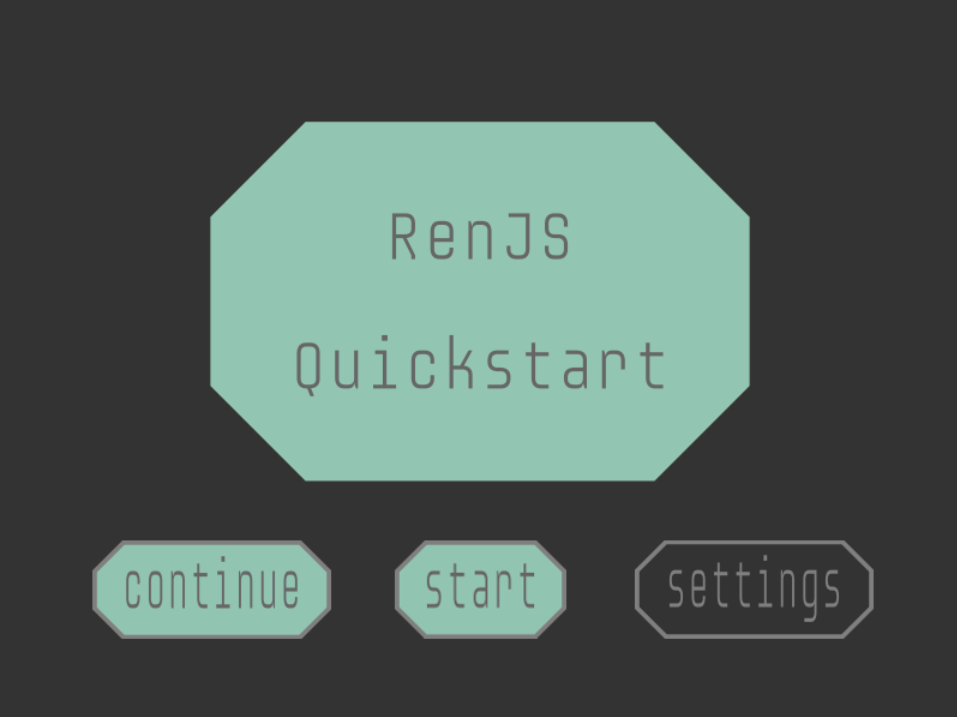
The main menu for the Tutorial and Quickstart games.
HUD
The HUD (heads-up display), is the method by which information is visually relayed to the player as part of a game's user interface; that is, everything you see in the screen while playing the game, that is not strictly part of the story itself. This includes the message box where the story text and dialogues will be displayed, the name box, where the talking character name will be displayed, buttons for using the Skip/Auto features or accessing the menus, any many more.
In addition to all of the elements available to the menus, the HUD has a few more:
Message Box: A box, usually ocuppying the bottom of the screen, where the story text will be displayed.
Name Box: When the text displaying in the Message Box is part of a dialogue, the an extra box will be shown containing the name of the character talking.
Click to Continue (CTC): To give the players all the time they need to read the contents of the Message Box, the game will not continue until they click anywhere on the screen. The Click to Continue is simply an animated image that will indicate to the players that the game is waiting for them to click to continue.
Choice Box: The choice action allows the players to make decisions during the game by choosing between different options. These options will be presented each in their own box, that the player can click as a button.
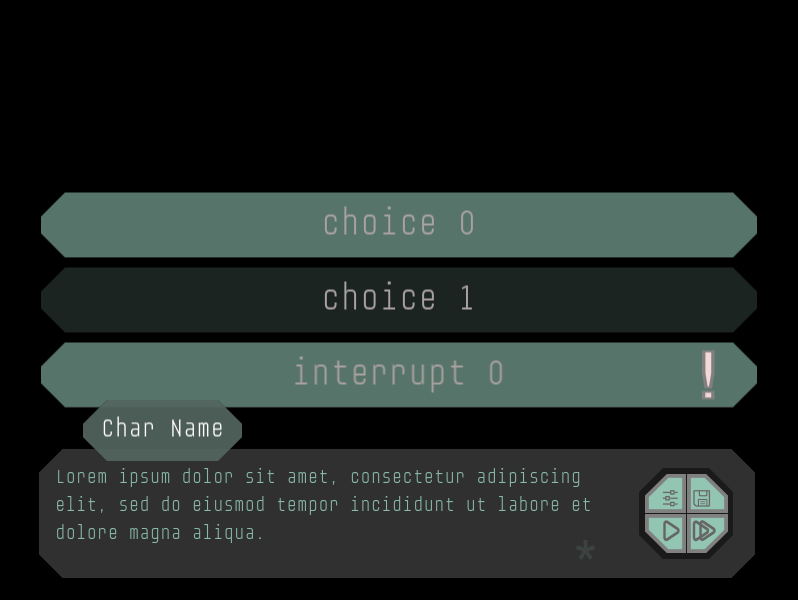
The HUD for the Tutorial and Quickstart games, featuring Message Box, Name Box, CTC, Choice and Interrupt Boxes and four buttons: Open Settings Menu, Open Save Menu, Skip and Auto.
Fonts
As we mentioned before a few times already, a RenJS game is actually a webpage. In webpages, when you want to use special fonts and styles, you need css files. CSS, or Cascading Style Sheets is a style sheet language used for describing the presentation of a document written in a markup language such as HTML.
The fonts you use for written text in the game are also part of the aesthetic of the game, so you'll want to choose them carefully. For example, you might want to use a cursive or gothic font for an historical or fantasy game. You can find a multitude of free fonts to use around the internet, usually in the ttf (TrueType Font) format. These files will have to be included in the game, and the way to include them is through the css font file.
The css font file will list all the fonts you will use in the game, and where to find the corresponding ttf font files. Finally, this file has to be included into RenJS, by way of pointing at it from the boot file, fonts property.
Let's see an example of a css font file. The font-family will be the name you will use to refer to that font in the GUI configuration file, and the src is a path on where to find the ttf font file. The path should be relative to the css font file, so if the css file and ttf file are in the same directory, the src should be only the name of the ttf file.
If you're using the RenJS GUI Builder tool this file will be created automatically.
The GUI File
Warning
The old GUI configuration file is no longer supported! Make sure your GUI yaml file has the structure as described in this section.
One of the ways to configurate the GUI is by manually writing the configuration file (GUI.yaml). This file is written in a way that is easy to understand and, therefore, easy to write.
The GUI file (identified in the boot file as guiConfig) has three main sections:
Assets: The list of assets used to build the gui, with key and file name.
Configuration: The way the assets will be used in each menu and the HUD.
Additionally, there are two more properties, such as:
Assets Path: All the asset files should be relative to this path.
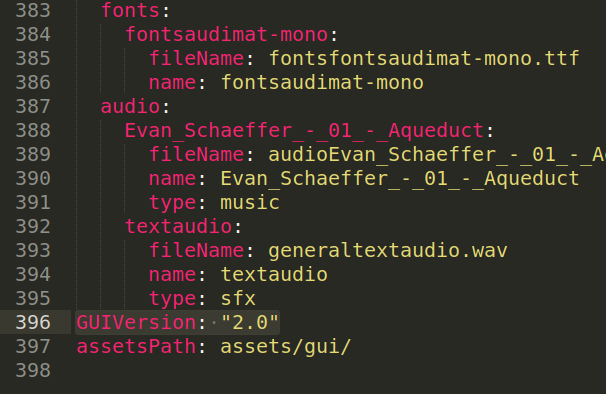
GUI Version: Used to identify which version of the GUI the YAML file refers to. This documentation corresponds to version "2.0".
assets:
	# assets list
config:
	hud:
		# hud configuration
	menus:
		main:
			# main menu configuration
		menu2:
			# other menu configuration
# path to assets
assetsPath: assets/gui/
# gui version
GUIVersion: "2.0"
Assets
A list of all the assets, ordered by their types: images, spritesheets (for the buttons), audio, etc. Most assets have only a tag (without whitespaces or special characters) and path, but the spritesheets take two extra parameters for width and height of each of its frames.
The fonts are a simple list, that should refer to the fonts configured in the css fonts file.
You can call each of this assets whatever you like, but it’s a good practice to use descriptive names for each one.
The config section of the GUI file, separated between hud and menus is where the magic happens. Each of the menus/hud configured here is a list of GUI elements describing how the GUI will look exactly. The elements (buttons, images, etc) will be loaded in order of appearance, meaning that the order of this list determines de z-order of the elements. For example, if you want to place an image behind a button, the image should appeart first in the list.
The gui and the menus configuration have the same format, but the hud has a few special elements used during the game, such as the message box, name box and choice box.
The following code sample shows the format a menu configuration should have. The properties for each element depend on the element type. The elements can optionally have an id, that will make them indexed inside the corresponding menu. What this means is that you'll be able to find it more easily programatically from a plugin.
config:
	menus:
		# menu tag
		menu1:
			# first element
			- type: ['image'|'button'|'label'|'slider'|'saveSlot']
			  [id: 'elementId']
			  elementProperty1: value1
			  elementProperty2: value2
			  ...
			# second element
			- type: ['image'|'button'|'label'|'slider'|'saveSlot']
			  elementProperty1: value1
			  elementProperty2: value2
Let's see how to configure each of the elements, starting with the general elements allowed by both menus and hud.
General Elements
Images
	- type: 'image'
	  # optional image id
	  id: 'imageId'
      # tag of asset as used in the assets list
      # if asset is spritesheet, the animation will be run in a loop
	  asset: 'assetTag'
	  # location from top left corner
	  x: 0
	  y: 0
Buttons
	- type: 'button'
	  # optional button id
	  id: 'buttonId'
      # tag of asset as used in the assets list
      # asset can have up to 4 frames -> over,out,down,up
	  asset: 'assetTag'
	  # location from top left corner
	  x: 0
	  y: 0
	  # optional sound effect to play when button is pressed
	  sfx: 'soundAssetTag'
	  # what the button will do when pressed
	  binding: ['start'|'load'|'save'|'openMenu'|'return'|'auto'|'skip'|'mute'|'otherAction']
	  # optionally, a button can be a "pushButton" with 'on' and 'off' state
	  # the asset of these buttons should have twice the amount of frames for when the button is pushed
	  pushButton: [true|false]
	  pushed: [true|false]
The binding of a button refers to the action that will be executed when the button is pressed. There are a few actions readily available to use, but you can add any other action from a Plugin.
Let's see what the available button bindings do, and what extra parameters they need.
start: Starts the game from the beginning, by starting the scene tagged as 'start'.
load: Starts the game from a saved game. The button needs a 'slot' property for loading the game. If no slot is specified, it will try to load from slot 0. If no data is found in the slot, it will start a new game.
save: Saves the current game. The button needs a 'slot' property for loading the game. If no slot is specified, it will try to load from slot 0.
openMenu: Changes from one menu (or the HUD) to another one. The button needs a 'menu' property to know which menu to open.
return: Return to the previous menu (or the HUD).
auto: Starts auto play mode. In this mode, the game will not wait for the player to click to continue after a text action. Can be a pushButton.
skip: Starts skip mode. This mode is like autoplay, but really really fast, and skipping transitions. Can be a pushButton.
mute: Mutes or unmutes the audio. Can be a pushButton.
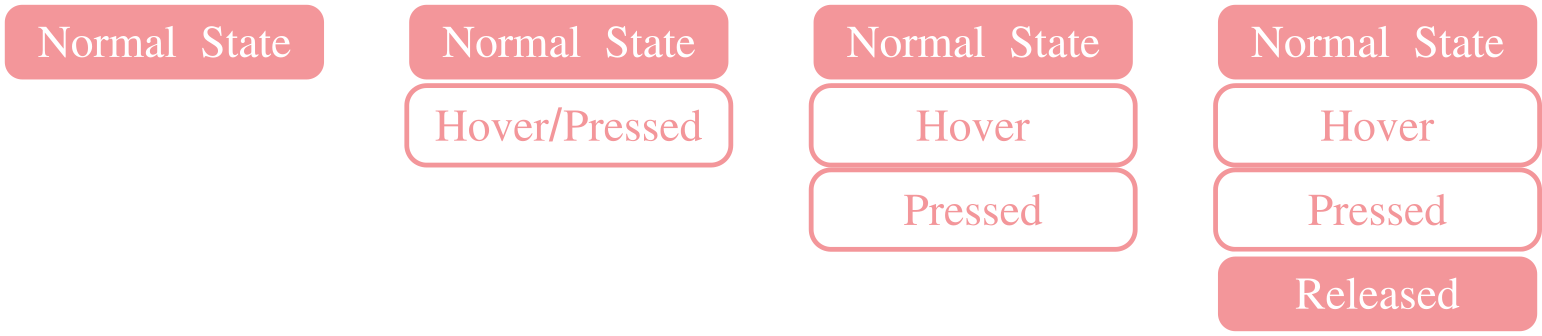
The asset of a button should be a spritesheet with 1 to 4 frames. Each frame will represent a different state of a button, and this will be determined automatically according to the amount of frames.
1 frame: The button will look always the same.
2 frames: Normal/Hover and Pressed
3 frames: Normal/Hover/Pressed
4 frames: Normal/Hover/Pressed/Released
In the case of a push button, you should have twice the amount of frames. The states will be the same, but adding the same states for when the button is pushed. For example, if the button normally has two frames, the push button should have four.
Button frames examples.
Labels
	- type: 'label'
	  # optional label id
	  id: 'labelId'
	  # location from top left corner
	  x: 0
	  y: 0
	  # text of the label
	  text: "Label 1"
	  # distance between the lines of the text (in multiline text) => 0: normal spacing, <0 tighter lines, >0 farther away lines
	  lineSpacing: 0
	  style:
	  	font: "audimat-mono"
	  	fontSize: "32px"
	  	fill: "#00FF00"
The text style in this element, and in any other element that uses text, can have any property allowed for Phaser Text objects. Some of the most important properties are:
font: The name of the font as configured in the fonts css file (and fonts list in this same file). It can also include style and size. E.g. 'bold 20pt Arial'.
fontStyle: The style of the font (it will override the style in font, if present): normal, italic or oblique.
fontWeight: The weight of the font (it will override the weight in font, if present): normal or bold.
fontSize: The size of the font (it will override the size in font, if present), in pixels.
fill: The color of the text as a hex color.
Text alignment has to be setup differently for single line and multiline texts. In multiline text you need to set:
wordWrap: Set as true for multiline text.
wordWrapWidth: If text is wrapped, what's the width in pixels to wrap it.
align: Horizontal alignment for multiline text. It can be: left, center or right.
In single line texts, the alignment is important relative to some other element. For example, the character names inside the name box. In these cases, where the text has a parent (not labels), you can set the alignment with these properties:
boundsAlignH: Horizontal alignment of the text within the parent. Can be: 'left', 'center' or 'right'.
boundsAlignV: Vertical alignment of the text within the parent. Can be: 'top', 'middle' or 'bottom'.
LabelButtons
      # type is button
      - type: button
        # optional id
      	id: labelButtonId
        x: 77
        y: 452
        # the asset of these buttons shouldn't have any text, since we'll add that dynamically
        asset: basebutton
        # same binding configuration as any other button
        binding: openMenu
        menu: saveload
        # the label property defines what and how text will be added
        label:
          # the text that will be written on the button
          text: continue
          # text position (x and y) can be omitted when centering inside image
          # x: 0
          # y: 0
          style:
            font: fontsaudimat-mono
            fontSize: 42px
            fill: '#808080'
            # center it inside the button asset by setting its bound alignment
            boundsAlignH: center
            boundsAlignV: middle
          # additional style properties that will be used when the mouse is over this button
          overStyle:
            fill: '#89BAA8'
          # additional style properties that will be used when the button is clicked
          clickedStyle:
            fontStyle: italic
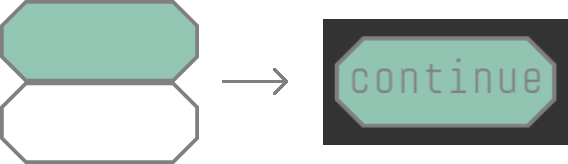
Base button + label = label button
Sliders
	- type: 'slider'
	  # optional slider id
	  id: 'sliderId'
      # tag of asset as used in the assets list
      # asset should have two frames => empty,full
	  asset: 'assetTag'
	  # location from top left corner
	  x: 0
	  y: 0
	  # optional sound effect to play when clicking on slider
	  sfx: 'soundAssetTag'
	  # what the slider will do when value is changed
	  binding: ['changeUserPreference'|'otherAction']
The binding of a slider refers to the action that will be executed when the slider is clicked on. This will change the value of the slider. The only pre defined action you can use with sliders is changeUserPreference that needs an extra property called userPreference to know wich value to change, such as:
textSpeed: How fast the message box animation will run.
autoSpeed: In auto mode, after a text action, the game will pause for a moment so the player has time to read. This value affects the lenght of this pause.
bgmv: Background music volume.
sfxv: Sound effects volume.
SaveSlot
	- type: 'saveSlot'
	  # optional saveslot id
	  id: 'saveslot'
      # tag of asset as used in the assets list
      # asset will be used as "empty slot" background
	  asset: 'assetTag'
	  # location from top left corner
	  x: 0
	  y: 0
	  # slot number related to this element
	  slot: 0
	  # screenshot of the saved game in this slot
	  thumbnail:
	  	# offset from the top left corner of the element
	  	x: 0
	  	y: 0
	  	# size of the thumbnail, in pixels
	  	widht: 40
	  	height: 40
HUD Specific Elements
Message Box
	- type: 'messageBox'
	  # id is mandatory, at least one message box in the HUD should be id='default'
	  id: 'default'
      # tag of asset as used in the assets list
	  asset: 'assetTag'
	  # location from top left corner
	  x: 0
	  y: 0
	  # sound effect associated with this message box
	  # related to charPerSfx configuration property
	  sfx: 'soundAssetTag'
	  # transition to show this message box, if not present the default message box transition will be used
	  transition: "CUT"
	  # if the message box should remain in the screen all the time (text will clear after actions, but box won't be hidden)
	  alwaysOn: false
	  # configuration for the text, should normally be wrapped
	  text:
	  	# position related to the top left corner of the box
	  	x: 12
	  	y: 12
	  	lineSpacing: 0
	  	style:
	  		font: audimat-mono
	  		fontSize: 32px
	  		fill: #FFFFFF
	  		align: left
	        wordWrap: true
	        wordWrapWidth: 550
	  # click to continue configuration
	  ctc:
	  	# position related to the top left corner of the box
	  	x: 500
	  	y: 100
	  	# ctc image can be a normal image or a spritesheet to animate
	  	asset: ctcAsset
	  	# sfx to play when the text in the message box is completed and ctc is shown
	  	sfx: ctcSoundAsset
	  	# The ctc can be animated: as a spritesheet or tweening the animation
	  	animationStyle: spritesheet|tween|static
	- type: 'nameBox'
	  # id is mandatory, if you're not using specific name boxes for characters, you should have one with id='default'
	  id: 'default'
	  # tag of asset as used in the assets list
	  asset: 'assetTag'
	  # location from top left corner
	  x: 0
	  y: 0
	  # transition to show this name box, if not present the default name box transition will be used
	  transition: "CUT"
	  # when showing text in the namebox, it comes associated with a character color too
	  # this color can be used to change the text color or tint the whole box
	  tintStyle: text|box
	  # configuration for the text, will normally be single line and aligned inside the box
	  text:
	  	# position related to the top left corner of the box
	  	x: 0
	  	y: 0
	  	style:
	  		font: audimat-mono
	  		fontSize: 32px
	  		# center inside the box
	  		boundsAlignH: center
          	boundsAlignV: middle
Choice Box
	- type: 'choices'
	  # id is mandatory, you should have at least one with id='default'
	  id: 'default'
	  # tag of asset as used in the assets list, should have the same format as a button asset
	  asset: 'assetTag'
	  # base location of the choices, related to choices alignment
	  x: 400
	  y: 300
	  # there will be a number of choices shown at the same time,
	  # each will be shown in its own box, one on top of another
	  # the alignment determines how to position the boxes related to the base location
	  alignment: centered|bottomUp|topDown
	  # separation between the choice boxes, in pixels
	  separation: 10
	  # transition to show the choices, if not present the default choices transition will be used
	  transition: "CUT"
      # when logChoices is set to true in the configuration, the previously chosen
      # options can be displayed a bit different to clue the player about it
      # chosenColor will tint the whole choice box and text
	  chosenColor: #FF0000
	  # chosenStyle properties will be added to the text of these options
	  chosenStyle:
        fontStyle: italic
	  # sfx to play when a choice is pressed
  	  sfx: soundAsset
	  # configuration for the text, could be either single or multi line
	  label:
	  	# position related to the top left corner of the box
	  	x: 0
	  	y: 0
	  	style:
	  		font: audimat-mono
	  		fontSize: 32px
	  		fill: #FFFFFF
	  		# center inside the box
	  		boundsAlignH: center
          	boundsAlignV: middle
        # style properties to add when the mouse is over this choice
      	overStyle:
        	fill: '#89BAA8'
        # style properties to add when the choice is clicked
        clickedStyle:
        	fill: '#FF0000'
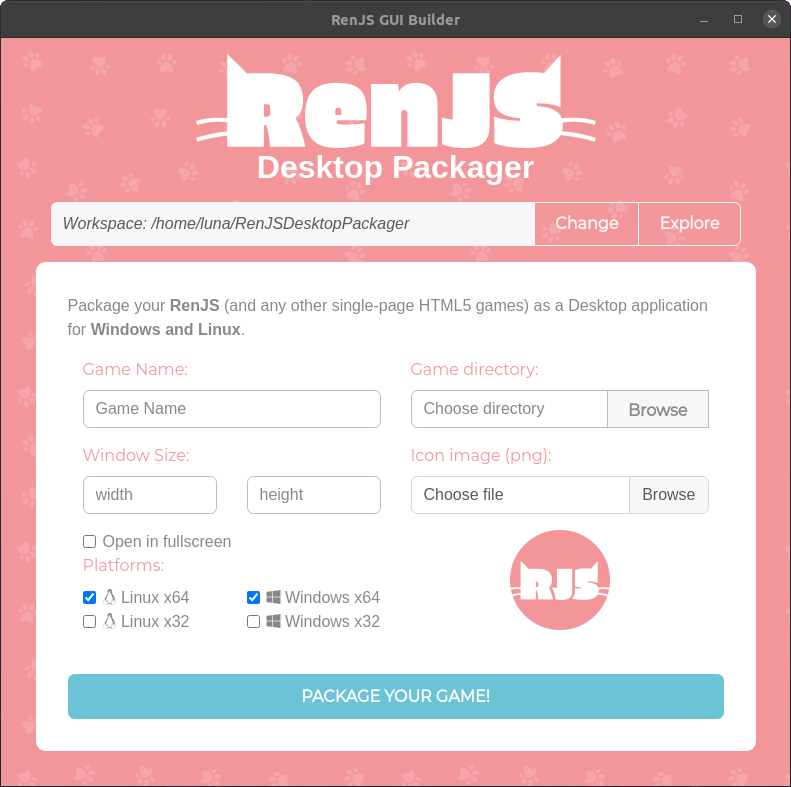
RenJS GUI Builder
RenJS GUI Builder is a tool to automate the creation of the GUI configuration file. This tool allows you to create the GUI by adding components visually, moving them around easily and adjusting every little detail until you have exactly the GUI you want. When everything is ready, you can build it, and this will create a template for your game where you'll only have to add the parts of your story.
Installation steps on Windows OS:
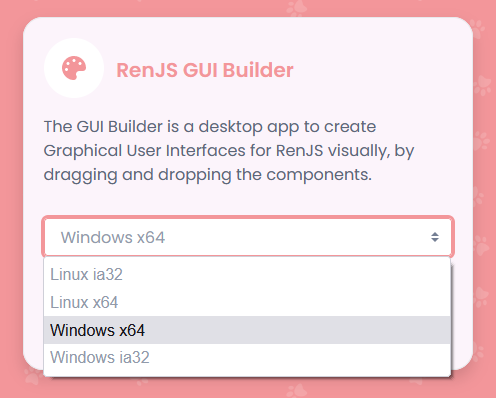
Go to the downloads section. Click on the dropdown for Ren JS GUI Builder. Choose 'Windows x64'if your Windows OS is 64bit or else choose 'Windows ia32'. Click on 'Download' button below.
Choose from dropdown as per your OS.
Extract the content of the compressed folder. You might need to do it twice as there is another compressed folder within.
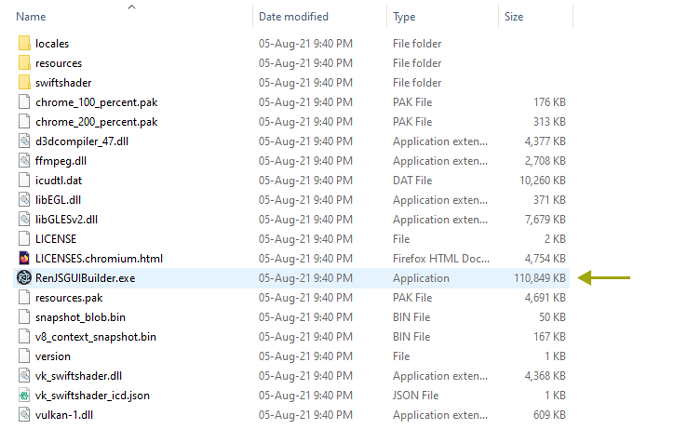
Go to the folder with extracted contents and click on the 'RenJSGUIBuilder.exe' file to start the application.
Go to the extracted folder and click the RenJSGUIBuilder executable.
Installation steps on Linux:
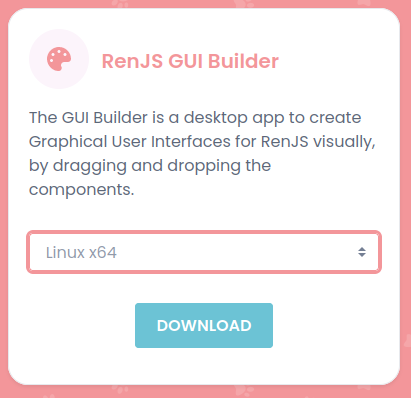
Go to the downloads section. Click on the dropdown for Ren JS GUI Builder. Choose 'Linux x64'if your Linux distro is a 64bit distro or else choose 'Linux ia32'. Click on 'Download' button below.
Choose from dropdown as per your OS.
Extract the content of the compressed folder.
Extracting compressed folder.
Go inside the extracted folder. Start a new terminal window there. Type in ./RenJSGUIBuilder The application should start.
open the terminal at extracted folder and run ./RenJSGUIBuilder
Warning
RenJS GUI Builder documentation coming soon!
GUI Conversion Guide
If your GUI file is in the old GUIBuilder format and you would like to profit from the new features of the new format, you'll have to convert it. You can do this manually, by checking out the new format and making the appropiate changes, or you can do it automatically by following this guide.
Since version 2.1.0 of RenJS, the old GUI configuration files are internally converted to the new format already, and you can take advantage of this conversion to update your GUI file.
The next steps will guide you through the automatic conversion:
Update RenJS: Make sure the RenJS version you're loading into your game is 2.1.0 or higher. Remember you load this file directly in the index.html file.
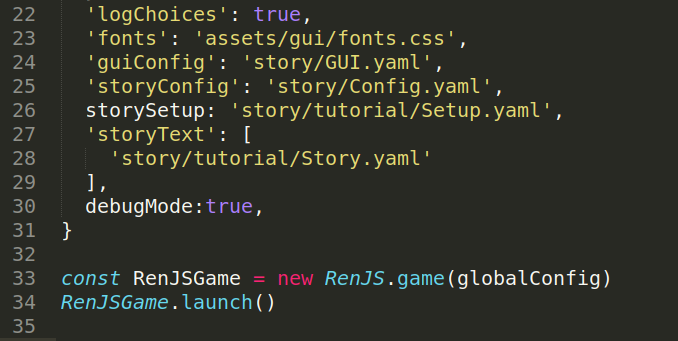
Set debug mode on: In the boot.js file, make sure you have the debugMode property set as true.
Debug mode on, in boot.js file.
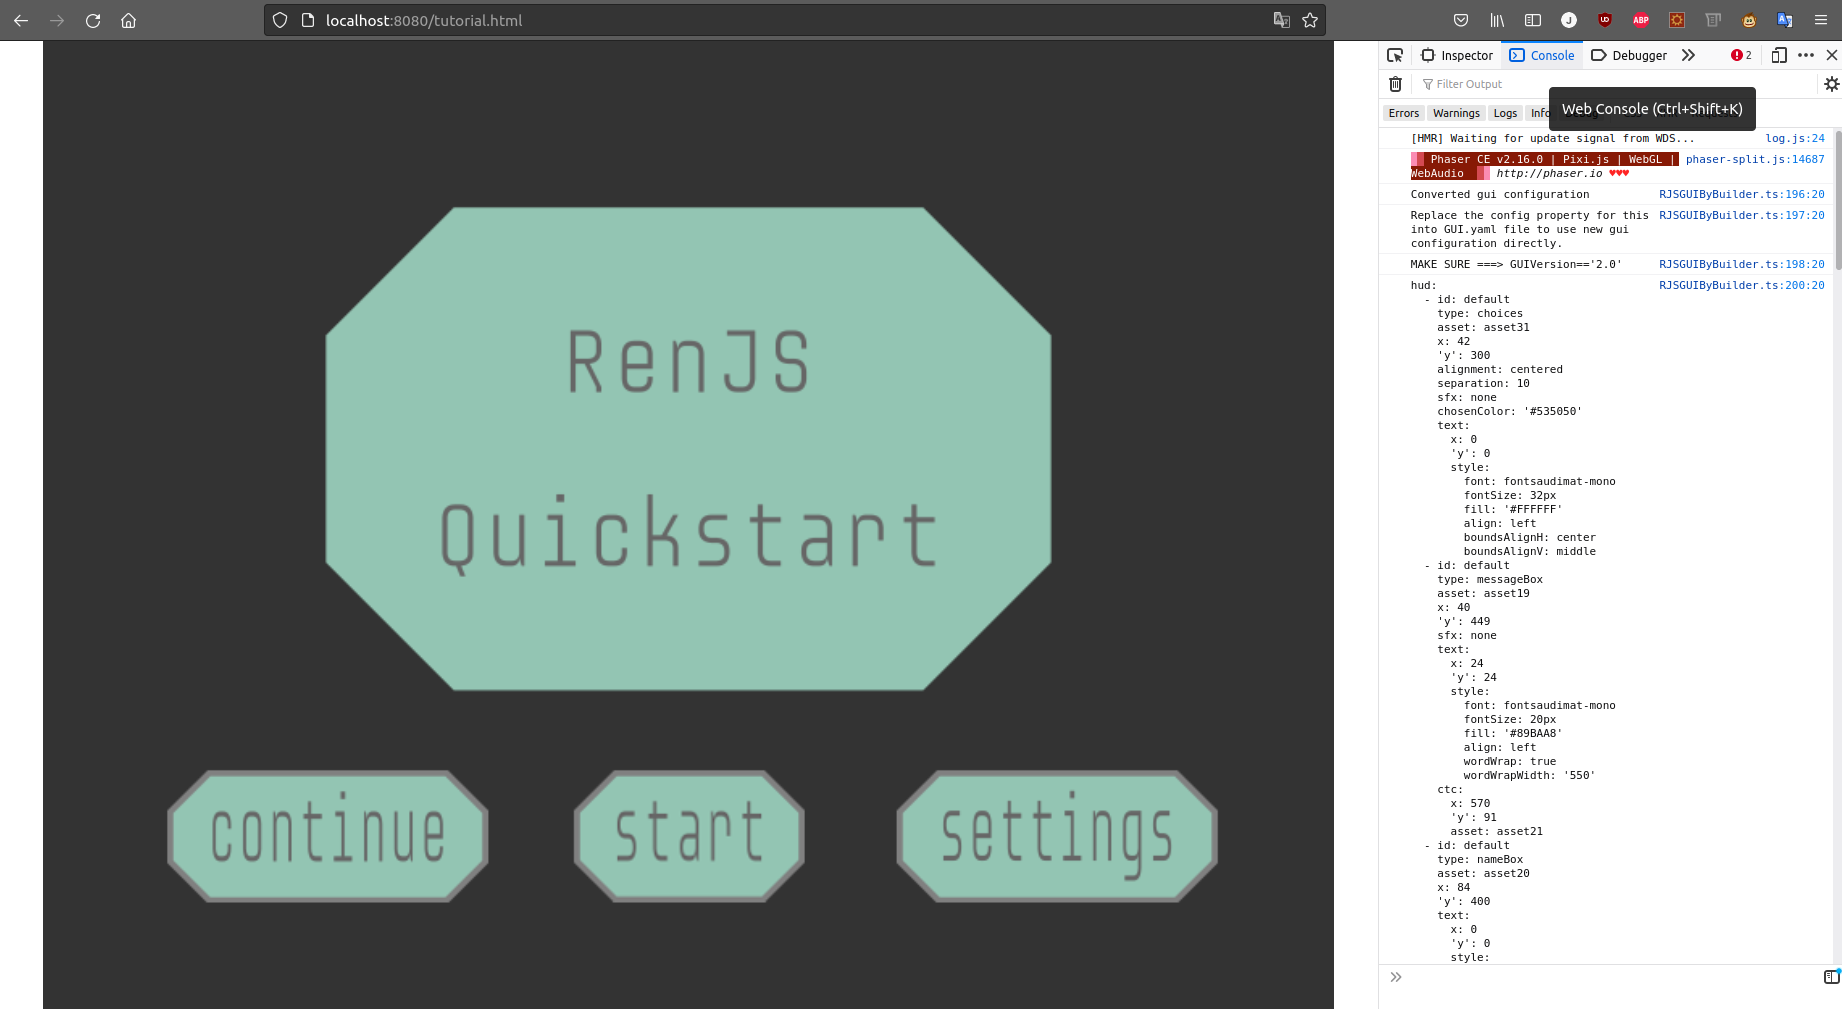
Run the game: Run the game locally as usual in a browser.
Open the console: Most web browsers come with a console to debug javascript. The debug mode in RenJS displays control messages that will be shown into this browser console. You can usually open the console by pressing F12 when in the broswer.
Open the browswer console by pressing F12.
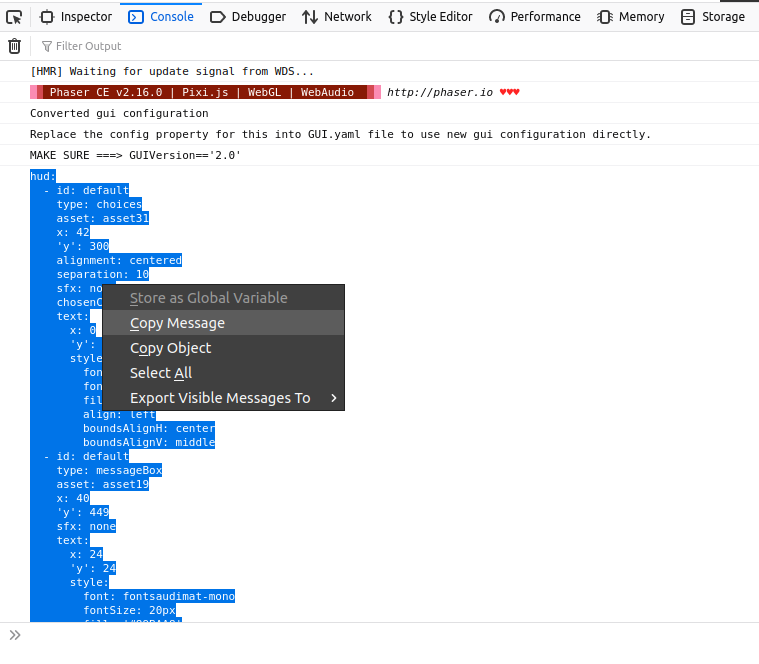
Copy the new GUI configuration: When the game has loaded, and it's showing the Main Menu, you can find in the console a message from the debugger showing the new configuration of the GUI. Select this message and copy it in its entirety.
Copy the whole message that shows the configuration (you can select everything, or directly copy the message).
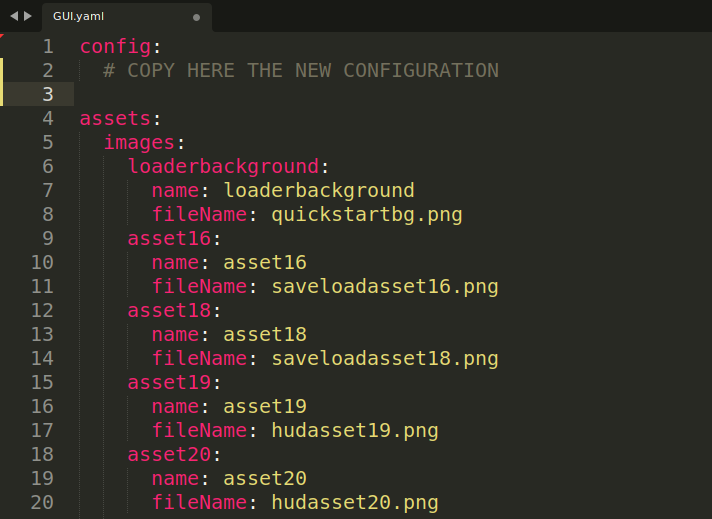
Paste the new GUI configuration over the old one: Open the GUI.yaml file and find the config property. You need to paste your new configuration over this element. Make sure you're not replacing neither the fonts list or the assets configuration.
Remove all contents from config property in GUI.yaml, and replace it with copied message.
Add GUI versioning: In the console, in addition to the new GUI configuration, another message will indicate a property to add to the GUI file, namely, GUIVersion, along with the value to set. Add this property to the GUI.yaml file. You can additionally the madeWithRenJSBuilder property, that is not used anymore.
Add the GUI version number at the end of the GUI.yaml file.
Save new GUI.yaml file: Make sure you save all changes made to the GUI.yaml file.
Set debug mode off: Go back to the boot.js file and set debugMode as false, or remove the property entirely.
Run the game with the new GUI format: Your game should now be running with the new GUI format, that you can modify manually to profit from the new features, such as multiple message/name boxes and Z ordering.
Story Actions
With RenJS, you make your game by writing a script. This script is structured as a group of interconected scenes, and each scene contains a list of actions that will be executed one after the other.
The actions are the way to tell the story. In the visual novel genre, a story is normally told by showing images, such as backgrounds and characters, and displaying text, and this is what you can do with each action.
There are many types of actions and each one has its own syntax, but usually they follow this pattern:
- action actor: extra parameters
The action will be the name of the action, the actor the object over whom it will apply, and the extra parameters can be anything. For example, the actions show, hide and play all follow this format exactly. There are some exceptions, like the action text, that doesn’t require an actor, or say, that is inverted as “actor says” to be written more naturally.
Other important aspects of the syntax are the dash, the colon and the indentation. The scripts are written in a format called YAML that is then translated to format a bit more computer friendly called json. For this translations to go smoothly, these three key points need to be respected. The indentation should be the same for all the actions in the list. Each action has to start with a dash followed a whitespace, to indicate it's an element of a list. And the colon separates both sides of the action. Even when the action doesn't have any extra parameters, the colon has to be present.
	- show [background]: WITH [transition]
	- show [character]: [character_look] WITH [transition] AT [position]
	- show [cgs]: WITH [transition] AT [position]
	# hide anything
	- hide [background|character|cgs]: WITH [transition]
Say and text
	- [character] says: Text
	- text: Text

	# Use text styles: bold italic and color
	- text: (bold)This text is bold(end), (italic)and this is italic(end).
	- text: This word is (color:#f593e6)colored(end)!
	- text: This is a(pause: 500) very(pause: 750) dramatic(pause: click) pause!
Play and stop
	- play [music|sfx]: WITH [FADE|CUT]
	- stop bgm: WITH [FADE|CUT]
Choice and interrupt
 	- choice:
	    - Option 1 text:
	      	- ACTIONS FOR OPTION1
	    - Option 2 text:
	      	- ACTIONS FOR OPTION2
	    - Option 3 text !if(condition):
	      	- ACTIONS FOR OPTION3
  	- interrupt:
	    - Interrupt 1 text:
	      	- ACTIONS FOR INTERRUPT1
	    - Interrupt 2 text:
	      	- ACTIONS FOR INTERRUPT2
	- interrupt: hide
Variables
	# define a variable and assign a value
	- var [variable_name]: [TEXT|NUMBER|BOOLEAN]

	# show variable in a text
  	- text: foo {variable_name} bar

  	# counter variable
  	- var counter: 0
	- var counter: {counter} + 1
If
	- if (CONDITION):
		- ACTIONS FOR CONDITION TRUE
	- else:
		- ACTIONS FOR CONDITION FALSE
Scene
SCENE1:
	- ACTIONS FOR SCENE 1
	# call another scene
	- scene: SCENE2

SCENE2:
	- ACTIONS FOR SCENE 2
Wait for time or click
- wait: [miliseconds|click]
Show and hide
The show action allows you to display images in the screen, while the hide action removes them.
RenJS has three different types of images that you can use: backgrounds, characters and cgs. This elements have to be declared in the Setup file before they can be used.
Show Backgrounds
A background is an image that normally stretches to occupy the whole screen, and will be shown behind all other elements. Since only one background can be displayed at a time, if there is already a background on screen, the previous one will be hidden automatically.
With the keyword WITH you can choose the transition to use when showing or hiding the background.
	# show background with id school_morning
	- show school_morning: WITH FADE
	# change one background for another
	- show school_afternoon: WITH FUSION
Show Characters
The characters in a Visual Novel are represented by many images, each one called a look, meaning a state of that character, such as emotional expressions, different outfits or body poses. Showing a character, therefore, means showing one of its looks. If the look id parameter is omited, the default look to show will be called normal.
With the keyword AT you can define where in the screen the character image will appear. The position can be a coordinate, two numbers separated by a comma (no whitespaces), or a special location, and will be relative to the center bottom of the images, more or less where the character's feet should be. If the position parameter is omited, the default position will be the DEFAULT position defined in the Config file.
Just like with backgrounds, a transition can be specified to define the way to show them.
	# show character with id deuzi, look id happy, centered in the screen
	- show deuzi: happy AT CENTER WITH FADE
	# show character entering from the side of the screen
	- show liz: AT OUTRIGHT WITH CUT
	- show liz: AT RIGHT WITH MOVE
	# show character at a specific coordinate in the screen
	- show liz: sad AT 500,600
Show a CGs
CG stands for Computer Graphics, and it's a name given to any image that is not a background or a character. These images are anchored in their center, which means, the position used in the show action will align with this center point.
By default, the cgs will be shown in a layer on top of characters and behind the GUI, but they can also be forced to be shown behind the characters (always on top of the backgrounds).
In addition to the transition and the position parameters, it's possible to change the scale (zoom) and angle of the image. If you want to move or animate a CG, use the animate action.
Just like with backgrounds and characters, a transition can be specified to define the way to show them.
	# show CG with id phone1 at a specific coordinate in the screen
	- show phone1: WITH FADE AT 200,200
	# show CG scaled and rotated
	- show phone2: WITH FADE AT 400,300
	  zoom: 0.5
	  angle: 180
	# show CG behind the character layer
	- show horse: AT 180,350 BEHIND
Hide images
You can hide any type of element with the action hide and its id.
If you want to hide all of the characters at the same time, you can use the special id CHARS, and if you want to hide everything, characters, backgrounds and cgs, there's the special id ALL.
Just like with the show action, a transition can be specified to define the way to hide them.
	# hide a character
	- hide deuzi: WITH FADE
	# hide all characters
	- hide CHARS:
	# hide all
	- hide ALL: WITH CUT
Hide all CGS
You can hide all the CGS at the same time using special id CGS, this is different from ALL.
	# hide all CGs at the same time
	- hide CGS: WITH FADE
Show, hide and continue
Sometimes you want to show (or hide) many elements at the same time. For example, show a background and a character at the same time, show or hide two characters, or show one character when another one is being hidden.
All of this can be achieved with the keyword CONTINUE. By default when showing or hiding elements, you will use a transition that takes a little bit of time, the most common one being FADE. When you Fade In or Out an image, the game will wait until the transition is over to execute the next action.
What the CONTINUE keyword does is make it so the game will execute the next action immediately after, without waiting for the transition to be over. This will effectively create the illusion that both actions are executed at the same time.
	# show a background and character at the same time
	- show school_morning: WITH FADE CONTINUE
	- show deuzi: WITH FADE
	# hide one character and show another at the same time
	- hide deuzi: WITH FADE CONTINUE
	- show liz: WITH FADE
	# show three characters at the same time
	- show deuzi: AT CENTER WITH FADE CONTINUE
	- show liz: AT RIGHT WITH FADE CONTINUE
	- show jair: AT LEFT WITH FADE
Animate
The animate action allows you to animate cgs. The animation can be a tween of the sprite properties, a spritesheet animation or a combination of the two approaches.
Tweening
Tweening means to change the properties of an element in time, linearly, from the original values to the new values. For example, we can tween the transparency of an image to make it transparent, by tweening its alpha property to zero. The time it takes to tween should be specified in miliseconds.
You can tween one or more of these properties:
Alpha: The transparency of the image. It goes from 0 (completely transparent) to 1 (completely solid).
Zoom: The scale of the image, as a proportion of the original size. For example, 1 is the same as the original, 0.5 is half of it, and 2 is twice it’s original size.
Position: Where is the image located in the screen, as a coordinate given as x y. The x and y numbers are relative to the top left corner of the canvas, and they can be outside of it too.
Angle: The rotation of the image, in degrees, from 0 to 360.
In the next example we first show the cgs called phone1 and then we tween the position and alpha in 1000 miliseconds (1 second). The effect this will give is the phone moving from one side of the screen to the other while disappearing.
  - show phone1: AT 100,100
  - animate phone1:
    time: 1000
    position:
    	x: 500
    	y: 100
    alpha: 0
Spritesheet Animation
Spritesheet animation is more like traditional animation: you have different frames for an image, and change them every few miliseconds to give the ilusion of movement. For this type of animation you need to load the cgs as a spritesheet in the setup.
A spritesheet animation can run once or looped, and in case of the latter, it can have a time limit or not. If the animation is looped and it doesn't have a time limit, the game will continue to the next action immediately, and you will have to stop the animation explicitly from the script.
Let's see how to use each mode with examples, by animating the horse spritesheet already used in the setup.
In this first example we simply show the horse and we animate the head animation. After the animation is get to the last frame, the action is finished, and the cgs image will stay as the last frame of the head animation. Then we do another action, and finally we repeat the animation, but backwards.
  - show horse: AT 180,350
  - animate horse:
    spritesheet: head
  - text: The animations can be player normally or backwards!
  - animate horse:
    spritesheet: head BACKWARDS
In the next example we animate the run animation, looped, by 1 second. After this time, the animation stops and the game continues to the next action. When the animation stops, the image will freeze in whatever frame it gets to. Finally, to reset it to the normal view, we call the animation stop.
The next example does something similar, but starts the animation without a timer. Another action is then executed (a say action) and finally the animation is stopped.
  - animate horse:
    spritesheet: run LOOPED
  - deuzi says: The horse will stop after this dialogue.
  - animate horse:
    spritesheet: stop
In the last example, we will combine the run animation with tweening the position, making it so the horse will run across the screen.
The actions say and text let you display a message inside the text box. The difference between them is that the say action will also display the name of the character inside the name box, in the colour of the propery speechText defined for that character in the setup. The text will be shown with a transition, letter by letter, until the message is complete. This transition can be skipped by the player by tapping anywhere.
After the message is shown whole, the click to continue image will be shown (if present in the GUI) and the game will wait until the player clicks to continue with the next action.
The say action can also include a look parameter, to quickly change the look of the character before the message is displayed.
	# display a message with text
	- text: You see someone approaching.
	- show liz: WITH FADE
	# display a message with say
	- liz says: Hey! What are you doing here?
	# display a message with say, changing the look
	- liz says angry: We were all looking for you!
The text to be displayed can include a few style tags to modify how it will look in the box:
(bold)text(end): Will make the text inside the tags appear in bold style.
(italic)text(end): Will make the text inside the tags appear in italic style
(color:#FF0000)(end): Will make the text inside the tags appear in the specified color. The color has to be a valid html color, either in hex format, or one of the allowed html color names.
(pause: click): Will add a dramatic pause at that point in the text. The rest of the text will be added after the player makes a click. It can also take a number for the amount of time to pause for, in miliseconds.
  - deuzi says happy: Hello! Do you like my new (color:#f593e6)voice(end)? I've always wanted to be a singer, you know.
  - jair says: Eh, I think... I think... It sounds really good.
  - liz says angry: What? Who are you and what did you do with Jair?
  - jair says angry: I just think it's pleasant to the ears, that's all. What, are you (italic)jealous(end)?
  - deuzi says: "(bold)Hey!(end)(pause: click) No need to fight about such things, I think we all sound great."
  - show jair: happy WITH CUT
  - liz says normal: I don't want to fight, but don't you find weird Jair has something (italic)nice(end) to say for the first time, like, ever?
  - deuzi says: Yes, it's weird,(pause: 1500) but I'm sure he'll find something nasty to say sooner or later.
  - jair says angry: Tsk, that's what I get for being honest.
  - endgame:
Play and Stop
These actions allow you to play and stop sounds. Sounds can be of two types, background music and sound effects. Each one should be defined in the right section in the setup.
You can play only one background music, or bgm at a time. If you do a play bgm action and another bgm is already playing, the first one will be stopped before starting the new one.
Background music can be played looped whole with the LOOPED parameter. You can also loop a bgm from a specific time with the LOOPED FROM time parameter. In this case, the music will start as usual, and when it reaches the end, it will restart but from the specified time (in seconds).
When executing a play action, if the bgm already playing and the new bgm are the same, nothing will happen, unless you add the FORCE parameter, in which case, it will restart the sound.
Sound effects, or sfx will only play once, and you can play as many as you want on top of each other.
To stop the bgm you don't need the id of the music currently playing, but simply use the bgm tag.
You can use the transitions CUT and FADE for both play and stop.
	# play a bgm once with fade in
	- play morningBGM: WITH FADE
	# play a sfx with tag ringtoneSFX
	- play ringtoneSFX:
	# change the music to schoolBGM looping the whole bgm
	- play schoolBGM: LOOPED
	# stop the background music
	- stop bgm:
	# play another bgm looping from the 2.5 seconds mark
	- play storeBGM: LOOPED FROM 2.5
	...
	## restart later the storeBGM bgm from the start, with parameter FORCE
	- play storeBGM: LOOPED FROM 2.5 FORCE
Choice and Interrupt
The choice action is one of the most important actions you can use, since it's the main way for the player to interact with the game.
This action will show a list of options to the player for them to choose, and each of these options will have a list of actions to execute only if the player chose them. This list of actions can be anything you do in a normal scene, including another choice, or a change of scene.
Normally, after executing the chosen option actions, the game will continue with the actions directly after the choice, but if a change of scene is triggered, any action after that one will be discarded.
In the next example three options will be displayed. If the player chooses the first option (with text "Yes!"), the scene will change after the dialogue, and the actions after the choice will be discarded. If the player chooses any other option, the game will continue with the actions after the choice, as normal.
    - choice:
      - Yes!:
        - deuzi says happy: That's great, let's go!
        - scene: leaveWithDeuzi
      - No!:
        - deuzi says: Ok, but I'm leaving!
        - hide deuzi:
      - Uh, I'm not sure?:
        - deuzi says: Well, think about it while I get my coat.
        - hide deuzi:
    - text: Deuzilene disappears in the crowd and you find yourself alone.
    - scene: stayInParty
Interrupt
An interrupt is like a choice action, but while the choice waits for the player to make a decision, the interrupt will display the option, but will not stop the game. If the player decides to interrupt, then the actions of the interrupt will be executed, before continuing.
The interrupt can include a number of actions to wait before disappearing (thus disallowing the player the interruption), but if the scene changes, any interrupt still showing will automatically disappear.
In the next example, the interrupt will be shown until the "hide interrupt" action is called.
  - deuzi says: I know you're new in town, so I thought I could show you around a bit.
  - deuzi says: What do you think?
  - interrupt:
    - Isn't it a bit awkward???:
      - deuzi says angryC: What do you mean?  Because I'm your teacher?
      - deuzi says happyC: We're almost the same age!
      - deuzi says normalC: You might be teaching some years from now too.
      - deuzi says angryC: Then you'll see how awkward it is to be called professor and be treated like and old person.
      - deuzi says normalC: Anyway, as I was saying...
  - deuzi says: You probably know it already, but this is a small town.
  - interrupt: hide
  - deuzi says: There's not much to see, really.
Visual Choices
The options of a choice can be images instead of text, in which case you will use the tag visualchoice, and each option should be the image id (it can be setup as a CG or as extra) and where it will be shown.
  - liz says: Choose a phone!
  - visualchoice:
    - phone1 AT 620,300:
      - play ringtoneSFX:
      - text: Tururu Ruru Ruru Ruruuuu
      - liz says: You chose the pink phone.
    - phone2 AT 180,300:
      - play ringtoneSFX2:
      - text: Pi Pi Ri Pi Ripi Pi Ri
      - liz says: You chose the light blue phone.
Show Message along with Choices
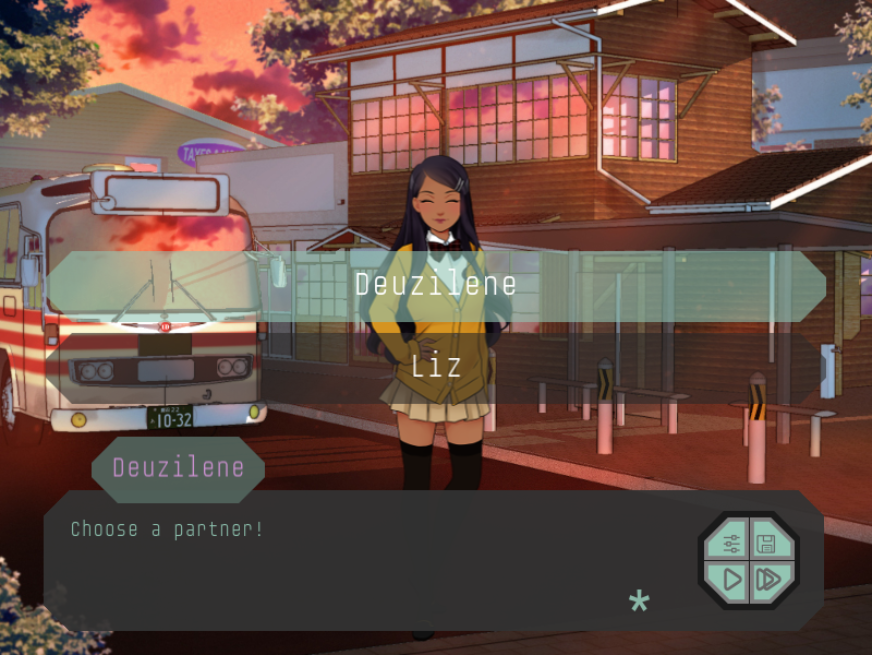
If you want to show a message along with the choices you can use the first line inside the choice action for this purpose.
  - show deuzi: happy
  - choice:
    - deuzi says: Choose a partner!
    - Deuzilene:
      - text: You chose Deuzilene!
    - Liz:
      - text: You chose Liz!
Say action along with choices.
Conditional Options
Sometimes you need to show an option only if a condition is met. In these cases, the conditional option can be used for either choices, visual choices or interrupts. If the condition is not satisfied, that option will not be shown.
To make an option conditional you need to add an if like structure, followed by a condition, exactly like the ones used in the if action.
In the following example, the last option will only show if the variable readBook is set to true.
  - choice:
    - Choose Deuzilene:
      - marco says: Good choice
      - var partner: "deuzi"
    - Choose Jair:
      - marco says: You really like a challenge, right?
      - var partner: "jair"
    - Choose no one !if ({readBook}):
      - show marco: surprise
      - marco says: No one has ever completed this task alone before!
      - var partner: "no one"
      - show marco: normal
  	- marco: So you've chosen {partner}, are you happy with it?
Variables
The var action allows you to store values during the story. These values then can be displayed in text or dialogues and can be used to compare and form conditions. The values will also be saved and restored when the player saves and loads games.
If you try to use a variable before it's defined in the story, the value will be undefined, and in the case of booleans, it will be false. What the var action does is declare and assign a value to a variable identified with a specific name.
This kind of behaviour is often called an assignment. An assignment is said to have two parts, left and right, separated by a colon. The left part has information about the variable being set, and in our case, also includes the name of the action. The right part contains the value that will be assigned to that variable, and it can be of three types: Strings (Text), Numbers or Booleans (Value true or false).
String Variables
String variables are text, and as such, they can be displayed in text and say actions. To get the value of a variable as text, you use the variable name surrounded by curly braces, i.e. {var_id}. You can also do this same thing when assigning String values to variables.
	# Create String variable with id name
    - var name: Spike
    # Create Number variable with id score
    - var score: 10
    # Create String variable with id report, using previous variables in the value
    - var report: "Hi {name}, you have {score} points!"
    # Show the contents of the variables
    - text: {report}
    - spike says: "What? Only {score} points? I though I was doing so well."
Numeric Variables
A numeric variable will be assigned a number. This can be a constant number, but it can also be an arithmetic operation that resolves into a numeric value: like addition, subtraction, etc.
To write an operation you need to use special symbols, like:
+ (Plus): Addition
- (Dash): Subtraction
* (Asterisk): Multiplication
/ (Slash): Division
The operations also can use parenthesis () to change the solving order of the operation. As with normal arithmetic operations, multiplication and division have precedence over addition and subtraction.
When writing operations, they should usually be between inverted commas. This is because the parser will sometimes freakout if it finds strange symbols. To ensure it reads the whole line as one text to analyse, better to be safe and surround it by inverted commas.
# create some variables with constant values
- var score: 0
- var extraPoints: 3
# modify the value of the score variable, by adding 10
- var score: "{score} + 10"
# create some more variables and do complex operations
- var bonus: "{extraPoints} - 1"
- var totalScore: "({score} + {extraPoints}) * {bonus}"
# display the value of the variable totalScore
- text: The total score is {totalScore}.
Boolean Variables
Boolean variables can store one of two values, a true or a false. But, as with numeric variables, they can be assigned operations that resolve into a boolean value.
The symbols used for these operations are:
&& (AND): The operation will be true if both values between the AND are true.
|| (OR): The operation will be true if either value between the OR is true.
! (NOT): The operation will be true if the value next to the NOT is false.
# assign boolean values directly
- var lightOn: true
- var lampOn: true
# do some operations
- var lightOff: "!{lightOn}"
- var allLightsOn: "{lightOn} && {lampOn}"
- var canRead: "{lightOn} || {lampOn}"
In the previous example the variables allLightsOn will be true only if both lightsOn and lampOn variables are true, but the canRead variable only need one of them to be true.
Another way of getting a boolean value is by comparing numbers and numeric variables. In this case, the symbols used for these operations are:
> (Greater than): The operation will be true if the left value is greater than the right value.
>= (Greater than or equal to): The operation will be true if the left value is greater than or equal to the right value.
== (Equal): The operation will be true if both values are equal.
<= (Less than or equal to): The operation will be true if the left value is less than or equal to the right value.
< (Less than): The operation will be true if the left value is less than the right value.
!= (Different): The operation will be true if the values are different.
As with the previous operations, parenthesis () are allowed.
In the previous example we use the numeric variables score and maxScore to decide the values of the boolean variables defined. The highScore variable will be true only if the score variable is greater then 10.
String variables can also be compared in this way using the equal operator.
- choseDeuzi: "{partner} == 'deuzi'"
If and Else
The if action allows you to branch your story. It contains a condition and a list of actions that will be executed only if the condition is true.
Optionally, it can also have a list of actions to execute if the condition is false, this is called an else action and it can only appear after an if. The lists of actions can contain whatever action available, including other ifs. After executing this list, the story will continue with the actions after the if (or else, if present).
The condition can be any boolean variable or operation, as seen in the var action.
  # if action with an operation
  - if ({partner} == "deuzi"):
    - show deuzi: happy
    - deuzi says: I knew it would be me!
  # else action
  - else:
    - text: Deuzilene looks disappointed but tries to hide it.
    # nested if, without elses
    - if ({goingSolo}):
    	- deuzi says: Let's see if you can beat my score.
  # unconditional actions after the if-else
  - text: You and your partner leave together.
Scene and End Game
The scene action is used to change from one scene to the other. Every scene in the story has a name and a list of actions that conform it. If no scene is called before or at the end of a scene, the game will simply stop.
You can name the scenes whatever you want, but the names can't have spaces or dashes (but you can use underscores and camelCase). Remember also that you need to have a starting scene called start.
# first scene
start:
  - show marco: WITH FADE
  - marco says: Good morning students, are you ready to choose your partner?
  - choice:
    - Yes:
      - scene: choosePartner
    - No:
      - marco says: What's the problem?
      #other actions

# second scene
choosePartner:
  - marco says: We should go to the teachers room
  - show teachersRoom:
  # other actions
If you want to end the game and return to the main menu you have to call the endgame action. Another way to end the game is through the strong>effect ROLLINGCREDITS. This effect takes a parameter called endGame, that, when set to true, will automatically end the game and return to the main menu after the effect is over.
  - text: What kind of ending?
  - choice:
    - End immediately:
      # end the game right now and return to main menu
      - endgame:
    - End after credits:
      # end the game after the rolling credits
      - effect ROLLINGCREDITS:
        endGame: true
        text:
          - This example made by
          - lunafromthemoon
Wait
The wait action allows you to force the player to wait for some time (in miliseconds) or until they click anywhere on the screen.
	- deuzi says: Ok, tell me when you're ready!
	- wait: click
	- deuzi says: I'm still not ready!
	- wait: 1000
	- deuzi says: Ok, let's go then!
Call
The call action allows you to execute javascript functions from a Plugin. You can send to this function as many parameters as you want.
  # this plugin will simply print the two words sent as parameters
  - call helloWorld:
    firstWord: 'hello'
    secondWord: 'world'
  # this plugin will add the given number of animated stars randomly in the screen
  - call addStars: 5
Ambients and Effects
These actions allow you to show visual and sound effects. The difference between them is that effect is a nuclear action that ends after its execution, while ambient effects perdure over time. For example, an effect can be a thunder, while an ambient can be rain.
RenJS comes with a few ambients and effects, and you can tailor them a bit to better suit the aesthetic of your game. All the assets used for these screen effects, either images, spritesheets, music and even code should be loaded in the extra section of the setup file.
You can add more screen effects, you can do so in the form of Plugins.
Ambients
The ambient action starts an ambient by name. Calling the special ambient CLEAR instead will stop any ambient still on. The available ambients are:
RAIN: Starts a particle emitter and background sound for a rain mood. You need two extra assets: rain (spritesheet) and rainBGS (looping audio)
SAKURA: Starts two particle emitters to look like cherry blossoms falling slowly, carried by a faint breeze. You need one extra asset called sakura (spritesheet).
SNOW: Starts three particles emitters for a snowy mood. You will need two extra assets: snowflakes (spritesheet) and snowflakes_large (spritesheet).
CLEAR: Destroys the particle emitters and background sound.
  # start ambient RAIN
  - ambient RAIN:
  - jair says: It started raining, when will it stop?
  # stop ambient
  - ambient CLEAR:
  - jair says: Well, that was fast.
Effects
The effect action executes a screen effect by name. The available effects are:
SHAKE: A screen shake.
FLASHIMAGE: It will flash an image for a moment, optionally accompanied by a sound effect and a screenshake. Parameters:
image: The tag of the image to show. This image has to be declared in the setup, usually in the extra section.
screenShake (optional): Boolean value. If true, there will be a screenshake.
sfx (optional): The tag of the sound effect to play.
ROLLINGCREDITS: Fades to black and starts scrolling a list of text like the rolling credits of a film. Parameters:
text: The list of text to show. If you want to leave some spaces between the lines, you can fill it with null lines.
music (optional): Music to start with the effect.
timePerLine (optional): How fast you want the scrolling, per each line, in miliseconds. Default value is 700ms.
endGame (optional): Boolean value. If true, the story will end when the scrolling is over and the game will return to the main menu. Default value is false.
	# screenshake
	- effect SHAKE:
	- marco says: It looks like there's going to be a storm.
	# show thunder
	- effect FLASHIMAGE:
		screenShake: true
		sfx: thunderSFX
		image: thunder
	- marco says: That's it, time to go home.
	# show credits and end game
	- effect ROLLINGCREDITS:
		endGame: true
		text:
			- Example made by
			- lunafromthemoon
			# empty line next
			- Made with
			- RenJS
Transitions
A transition is the way in which a image will be shown, hidden or exchanged for another one. Changing the position of an image, or flipping it, follows the same process with a show action, therefore it can happen that an image will be changed by that same image. There are a few transitions ready to use, but you can make your own transitions as Plugins and use them transparently.
The available transitions are:
CUT: The image will simply appear or disappear at once. When exchanging images, for example, one character look to another, the effect will be immediate.
FADE: This transition will interpolate the alpha (transparency) of the image in time. To show an image it will go from alpha 0 to alpha 1, in a FADE IN; to hide it, it will do the contrary, going from alpha 1 to alpha 0 in a FADE OUT. To change on image for another, it will first do a complete FADE OUT and then a FADE IN.
FUSION: If used to show or hide an image, FUSION will behave exactly like FADE; but when changing images, FUSION will place the new image on top of the old one, with alpha 0, and do a FADE IN. This will look aproximately like one image is fusing with the other one. This transition will work best with images that have the exact same outline, for example, backgrounds, or characters that don't change their look shape.
FADETOBLACK, FADETOWHITE, FADETOBG: In this transition the whole screen will be covered by a color in a FADEIN, then the changes to the images will be performed, and then a FADEOUT of the overlay will reveal the changes. In FADETOBG, the color is the background color defined in the boot configuration of the game.
MOVE: This transition, normally used for characters, will interpolate the current position of the image to the new one. For example, to show a character entering the screen from the right first you would show it in the position OUTRIGHT (outside of the screen, to the right side), and then show it at another position, using the MOVE transition.
Multilanguage Games
RenJS provides an Internationalization (I18N) module, that allows you to distribute your game with many languages all in one.
When translating games there's one approach often used, where each dialogue and text in the game has an identification key that is replaced by the correct phrase in runtime. This way of doing I18N brings its share of problems. For example, it makes the script a lot less legible. But the biggest issue is that it limits the translations themselved, since each text would have to be in the same order and about the same length, a rule that is very inconvenient to follow.
For these reasons, the way I18N works in RenJS is by having different resources for each language. These resources can be anything, such as images and sounds, but also the script of the story itself.
In this way, each resource in the game will be labeled with each language tag, or as neutral. When starting a game, the player will have to choose the language, and the corresponding resources will be loaded.
You can use this feature for any case in which you might want to have different resources for the same game. One other usual use case could be using different resources for a NSFW game with a censured version.
Language Selection Screen
One of the first things to do when adding multilanguage support is setting up the Language Selection Screen. This screen will be the first thing a player sees, even before loading the rest of the game, which means it has to be configured in the boot.js file.
Let's see a simple language selection screen for the Quickstart game.
The Language Selection Screen is setup under the i18n tag, and it's somewhat similar to the Loading Screen configuration. It has a background, that simply points to a background, and then a list of languages under the lang tag.
Each language is configured under a Tag, that is the key name of the language. In this example we have two languages: English with tag en and Spanish with tag es. These tags have to be unique for each language, but they can be whatever you want. The configuration itself is for a button that when pressed, will start loading the game in that language.
Asset: The spritesheet representing the language button. It should have two or three frames for: Normal View, Hover View and Pressed View.
Size: The height and width of each frame in the button spritesheet.
Position: The position where the button will be displayed.
Resources Configuration
Once you have your Language Selection Screen setup, we need to be able to pick the different resources for each language tag. For this you will place the segregated resources in diferent directories, named after these tags. For example, if you normally have a directory called story where you put the file Story.yaml, now you could have inside it two more directories, en and es, each one with the correct story file inside.
The second step is pointing at the right files from the boot.js/GUI.yaml/Setup.yaml files, by using the special tag LANG. This tag will be converted into the chosen language tag in runtime, making it point to the right resources.
In this example, we can see some of the resources are separated into languages, but some others are not. The Loading Screen has the same background, but the Loading Bar asset will be different depending on the language.
Same thing for the yaml files, some of them are neutral, such as Setup.yaml, but others like the story itself and the GUI are picked for the language.
Observing this example we can see also that we will have two places where the resources will be segregated: One in the story directory, and one in the assets directory.
RenJS (> v2.6) provides an Accessibility (A11y) module, that automatically adds all your GUI and story elements to an accessible DOM layer on top of the game canvas in order to support keyboard navigation and screen-reading.
Each element (e.g. buttons, sliders) will have a label taken from its binding action.
Additionally, it's possible to include an A11y configuration file, in YAML format, to overload some of the labels. The binding actions of the elements are not usually human friendly, so it's good practice to use this file to overload them. The same issue arises for visual choices, where the image tag will be used.
Combined with the I18N module, it's possible to add different A11y files in different laguages too.
The A11y configuration file
If an A11y config file is going to be used, it needs to be declared in the boot.js file, along with all the other configuration files.
Now let's see how a minimal A11y configuration file looks like.
# Replacements for accessible button labels
# the default labels will be the internal binding + menu/save slot keys
buttons:
  openMenu saveload: save/load
  openMenu settings: settings
# Replacements for accessible slider labels
# the default labels will be the internal binding + user preference keys
sliders:
  changeUserPreference bgmv: music volume
  changeUserPreference sfxv: sound effects volume
  changeUserPreference textSpeed: text speed
  changeUserPreference autoSpeed: auto speed
# Replacements for accessible choice labels
# the default labels will be the choice text, or in the case of visual choices, the cg key
choices:
  phone1: Liz's phone
  phone2: Deuzilene's phone
We have a buttons section, a sliders section, where the labels for different binding actions are overloaded to be much more human friendly. And finally, the choices section will be used to overload the visual choices labels when they are displayed.
Plugins
With RenJS you can create a classic Visual Novel just by writting your script (and a few configuration files), no need to know any programming. But what if you need some extra feature? For example, you could want to add a hidden-object minigame, a very complex HUD, or a gallery of scenes or achievements.
To do this, to extend RenJS, we have the Plugins. Plugins are pieces of javascript code that you can call from inside the game. With the Plugins you can do anything you want, from simply doing some calculations to extending RenJS and using it as a base to create a game of a completely different genre.
To create and add a Plugin to a RenJS game, you'll have to create a javascript object extending the RenJS.Plugin class. This plugin object will have a property called game (called with this.game) that will refer to the RenJS game, that is in itself, a PhaserJS game. With this property you will have access to any of the contents of your game (e.g. the current background displayed), but also to the whole suite of tools that Phaser provides.
In short, anything you can do with javascript, and in particular, anything you can do with PhaserJS is possible to do from within a RenJS game.
	class HelloWorld extends RenJS.Plugin {

		onCall(params) {
			console.log('Hello World Plugin');
			console.log(params.firstWord + ' ' +params.secondWord);
			this.game.resolveAction();
		}
	}

	RenJSGame.addPlugin('helloWorld',HelloWorld)
In this minimalistic example, the plugin is created, extending the RenJS.Plugin class, with just one function. The funtion onCall will be called from the story script, when using the call action. This example does nothing but printing on the console the parameters sent, and finally, it calls the this.game.resolveAction() function to let the game know it can continue with the next action in the script.
Plugin Structure
As seen in already, the function onCall, allows you to call a function from the story script. But there are many other ways to use the Plugins besides this specific use case. The RenJS.Plugin Class provides handles for each phase of the game where you might need to add your own functions, that you need to simply overwrite.
Let's see in more detail the structure of a Plugin, and what handles can be overwritten.
export default class Plugin implements PluginInterface {

	protected game: RJS;
	protected name: string

	constructor(name, game){
		this.game = game;
		this.name = name
	}

	onInit(): void {
		// called after everything is loaded (unless lazyloading), before showing any menu
		// base plugin does nothing
	}

	onStart(): void {
		// called when new game is started, just before interpreter is called
		// base plugin does nothing
	}

	onLoad(slot,data): void {
		// called when loading game data, before loading the game
		// "data" parameter can be modified here and change what will be loaded
		// base plugin does nothing
	}

	onLoaded(): void {
		// called after loaded data recreated the saved point, just before interpreter is called
		// base plugin does nothing
	}

	onSave(slot,data): void {
		// called just before saving game data to localstorage
		// "data" parameter can be modified here and that's what will be saved
		// base plugin does nothing
	}

	onCall(params): void {
		// called from the story, by using "call" action
		// base plugin does nothing
	}

	onAction(action): void {
		// called before executing every single action, with actual action object
		// base plugin does nothing
	}

	onEndScene(params): void {
		// called when the interpreter runs out of actions, normally when a scene ends without calling another scene
		// base plugin does nothing
	}

	onTeardown(): void {
		// called when game ends, before returning to the main menu
		// base plugin does nothing
	}

	onUpdateLoop(): void {
		// called on every Phaser update loop: https://phaser.io/docs/2.6.2/Phaser.State.html#update
	}

}
This is the class definition of the RenJS Plugins. As you can see, the constructor receives a name and the game object, that will be later available to use from any of the handles. Then handles themselves are empty and do nothing unless you redefine them.
On Init
The onInit() handle will be called when the game is loaded, but not yet started. The only phase previous to this one is preloading of the game and initialization of the game itself. So, the game will be fully loaded, the GUI will be created (but no menus are shown yet), and the story text, setup and configuration will all be available for you to use.
This handle is perfect for adding new features to the GUI, since no part of the GUI, except the loading screen, is shown yet. For example, you could add new menus like a gallery, a glossary, etc.
On Start
This handle will be executed at the start of a new game, just before the first action of the script is executed. Use it to set up things you need to do in a per game run basis. For example, if you want to change some things in a New Game + run.
On Action
This handle will be executed before executing a new action. The parameter received is the parsed Action object, with all its parameters.
On Call
The onCall handle will be called from the story script, by way of the call action. You can send to this handle as many parameters as you want (and in any format), and there is no limit to what you can do inside it. The only mandatory thing is that, at some point, there has to be a call to the this.game.resolveAction() function.
The functions you call during the story can be, as previously said, basically anything. RenJS can't make any asumptions on when the action is over to continue executing the next action, since these functions can be either syncronous (when the function is over, the action is over) or asyncronous (the function is over, but the action is still pending). For example, if you want to use an external API called as a REST service, you'll normally need to wait for the asyncronous response.
Let's see an example of the same Hello World plugin we saw before, but this time we will make it asyncronous.
In this case, when each line of the function is done executing, the function is technically over, but the action still waits for the timeout callback to finish, and let the game know it can continue with the next action in the script.
On Save, On Load, On Loaded
These handles are called, as you might imagine, when saving and loading the game. RenJS saves games in slots (identification number), locally into the player's browser.
You could use these handles to save and load data to and from an external API, and so have your players data online, making it available in different devices. You might also want to use them to add other information to the saved game, for example, a timestamp, and much more.
The onSave handle is called just before the game is saved locally, receiving the slot and data to save. Whatever modification you do to the data parameter will be saved too.
The onLoad handle is called when the data is retrieved, just before setting the game up. Just like onSave, it will receive the slot and the data to load. By modifying the data parameter you can change too what will end up being loaded.
The onLoaded handle is called just after the loaded data was used to setup the game, but before the interpreter is called. You can use this handle to modify, for example, sprites or graphical elements created when loading.
	class CloudSaving extends RenJS.Plugin {

		onSave(slot,data) {
			// data is an object with all the information of the current game
			// this data will be saved locally in the browser, in localstorage
			// slot is a number used to id the game

			// save in the cloud as a string with the given slot
			let serializedData = JSON.stringify(data)
			cloudAPI.set(`MyRenJSGame_slot_${slot}`,serializedData)
		}

		onLoad(slot,data){
			// data is an object loaded from localstorage
			// if no data is found locally the object will be empty
			// you can add/replace any property you want to the data parameter

			// load data from the cloud with the given slot
			let serializedData = cloudAPI.get(`MyRenJSGame_slot_${slot}`)

			if (serializedData) {
				// parse as JSON
				let loadedData = JSON.parse(serializedData)
				// add loaded data to the data parameter sent
				Object.assign(data, loadedData)
			}
		}
	}

	RenJSGame.addPlugin('CloudSaving',CloudSaving)
On Teardown
This handle will only be called when the player goes from the story to the main menu, usually, after finishing the game. If the player simply closes the game, it will not be executed. Use to clean up any big memory objects you might be using during the story, but avoid saving data or doing anything else that is of big importance for the story.
On End Scene
This handle will be called when the interpreter runs out of actions to execute. This can happen only if a scene is finished and no "scene" action or "endGame" action is called. Normally, you don't want this to happen, since there is no normal way for the player to continue, but sometimes this is expected. For example, the point and click plugin waits for a scene to end before enabling the clickable objects for the player, and when the player clicks an object, then another scene will be called.
Adding Transitions
Another way to use the Plugins is to add new transitions to the game. A transition is simply a function that will receive two sprites: from and to, and a few other parameters. The goal of this function is to transition between these two sprites, so that from will end up hidden at the end of the transition and to will be shown. The extra parameters are position and scale, that have to be set in to.
Since sometimes you'll want to show or hide elements without showing another, it's normal that one of the parameters from or to will be missing, so you have to check that in the function before doing anything else.
Since transitions can take a bit of time to go from one state to the other, these functions return a Javascript Promise, to let the game know when the transition is over.
Finally, you need to add this transition to the transitions manager inside RenJS, that you can access from this.game.screenEffects.transition. In this way, you'll be able to use it as any of the usual transitions.
Let's see an easy example on how to add a new Transition. This example will transition from one sprite to another one by first hiding the old sprite, then waiting for one second, and finally shoing the new sprite. It is probably not really useful in a story, but it's a good way to see what does what.
	class MoveAfterOneSecond extends RenJS.Plugin {

		// We add the transition on the onInit handler, to make sure it'll be available all the time
		onInit(){
			// We add the transition to the transition manager, with the name 'MoveAfterOneSecond'
			this.game.screenEffects.transition['MoveAfterOneSecond'] = (from, to, position, scaleX) => {
				// We need to return a promise so the game will know when the transition finished
				return new Promise(resolve => {
		            // set new properties
		            to.x = position.x;
		            to.y = position.y;
		            to.scale.x = scaleX;
		            //hide old sprite
		            from.alpha = 0;
		            //wait for one second
		            setTimeout(() => {
		            	// show new sprite
						to.alpha = 1;
						// finish transition
						resolve();
					}, 1500);
		        });
			}
		}
	}

	RenJSGame.addPlugin('MOVEONESECOND',MoveAfterOneSecond)
Let's see in more detail what the parameters are:
From: A Phaser Sprite representing the RenJS element (a background, character look or cgs) to hide. When showing an element for the first time, this property will be null.
To: A Phaser Sprite representing the RenJS element (a background, character look or cgs) to show. When hiding elements, this property will be null.
Position: An object with properties x and y where the To element should appear.
ScaleX: A number with the scale in the x axis for the To element. This number is usually either 1 or -1, and represents the sprite as flipped or not.
Make sure to check if the from and to elements are not null before using them, and also that at the end of the transition, the from element is hidden (alpha=0) and that the to element is showing (alpha=1).
You can use this transition with the name used to index it in the Transition Manager as you would any other transition. For example:
start:
	# Show deuzi at once
	show deuzi: WITH CUT AT LEFT
	# Move deuzi to the other side of the screen after one second
	show deuzi: WITH MoveAfterOneSecond AT RIGHT
RenJS Internals
We said that when creating a Plugin, the this.game property will contain a reference to the RenJS game, and that you can take advantage of this to do whatever you want with it. But this means little if you don't know what's inside a RenJS game itself.
While you shouldn't care too much about how RenJS does things, knowing where to find some key elements will make the programming of your Plugins much easier.
The Managers
The different parts of the story are all taken care by different managers, and you can access them with the property this.game.managers. Knowing what each manager does and what information they keep is key to understand how RenJS works. Let's see what managers there are:
Background: Access this manager through this.managers.background. This manager takes care of the backgrounds of the story.
Current Background: Access the current background (Phaser Sprite) with this.managers.background.current.
Character: Access this manager through this.managers.character. This manager takes care of the characters of the story.
Characters Metadata: A map of all the characters metadata, such as displayName and color. Access it with this.managers.character.characters[character_tag]. If the character is currently showing on screen, the currentLook property will be the corresponding Phaser Sprite.
Current Characters Showing: A map of all the characters currently on screen, with look, position and scaleX. Access it with this.managers.character.showing[character_tag].
CGs: Access this manager through this.managers.cgs. This manager takes care of the cgs of the story.
Current CGs: The information of the currently on screen cgs is contained in two maps. With this.managers.cgs.current[cgs_tag] you can access all the metadata from the cgs, such as position, zoom, angle, layer (it determines whether they're shown in front or behind the characters) and flipped. The Phaser Sprites, meanwhile, are contained in the map this.managers.cgs.cgs[cgs_tag].
Audio: Access this manager through this.managers.audio. This manager takes care of all the audio of the story.
Current Music and Sound: You can obtain the Phaser.Sound objects for all music and sounds with this.managers.audio.current. The background music is available under the bgm key; all other sounds have their own unique key names (you can find all of them using Object.keys(this.managers.audio.current)).
Logic: Access this manager through this.managers.logic. This manager takes care of the permanent variables set with the Var Action, and branching the story by way of choices and ifs.
Variables: You can obtain the map of all the variables that have been set throughout the game with this.managers.logic.vars. You can read, modify and even completely change this map to whatever you want.
Choices Log: The property this.managers.logic.choicesLog contains a log of all the choices the player has taken in the current run of the game, with an identifier for the choice (in the actions stack), the index of the option and the text itself.
Transitions
You already know that Transitions are the effect we use to show, hide or interchange sprites (backgrounds, character looks, CGs). You can reuse these transitions in your plugins, not only to create more types of transitions, but also in other cases where you might need to show or hide sprites.
You can find all of the transitions, by tag name, inside the object this.game.screenEffects.transition. All transitions return a Promise to let you know when they finished transitioning.
FADEIN(to, position?, scaleX?): Use this to show any sprite fading in.
FADEOUT(from): Use this to hide any sprite fading in.
FADETOCOLOUR(from, to, colour, position?, scaleX?): This transition is used internally when doing FADETOBLACK, FADETOWHITE and FADETOBG, and you can use it to fade the screen to any color you want.
The GUI
The GUI Configuration lets you describe how the GUI will be created, but you might want to add your own parts to it programatically, and for that you need to know where to find the actual Phaser objects representing the GUI.
While the GUI is quite complex, each of the big subdivisions (each menu and the HUD) is all contained into their own object, with all the sprites inside their own Phaser.Group.
Some of the things you can find inside the GUI object are:
GUI Configuration: The original configuration, as a json file, is available in this.game.gui.config.
Menus: The Phaser Groups holding each of the menus can be found in this.game.gui.menus[menu_name]. If you want to add graphical elements to the menus, you have to add them to these groups.
HUD: The Phaser Group holding the HUD can be found in this.game.gui.hud.
Choices: The Phaser Group for the choices can be found in this.game.gui.hud. This group will be empty most of the time, since the Choice Boxes will be created on the fly when executing a Choice Action.
Setup and Configuration Files
You might want to access the setup and configuration files of the game. While these files have some structure they should follow, you can also add as many elements as you want. This can be very handy when creating Plugins with lots of setup. You could have this information hardcoded into the Plugin (e.g. as a json object), but it can be easier to use the YAML files and have everything tidy in the setup file.
Story Setup: The story setup (Setup.YAML file) will be in this.game.setup.
Story Config: The story configuration (Config.YAML file) will be in this.game.storyConfig.
Game Config: The game configuration (object sent to the game in boot.js) will be in this.game.config.
Phaser JS
And finally, as RenJS is based on PhaserJS, the this.game property is also a reference to a Phaser Game, and you can use it to create sprites, groups, physics, particle systems, and much more. Don't forget to check out their examples page and their API documentation.
Mobile & Desktop
As seen in previous sections, RenJS allows you to create HTML5 games, that is, games that run in a web browser. This means that any platform with a running web browser should be able to run your game. Linux, Mac, Windows and even mobile devices like smartphones and tablets can currently do this, so by creating your game with RenJS, it's effectively multiplatform.
But what if you don't want the game to be fully online? Distributing the source code and executing an html file locally works, but the player would have to setup a local server to be able to play it. To avoid all of that, there's a better alternative. You can package your game as an executable for each platform.
There are many alternatives out there to achieve this, but the most popular are:
Cordova: Targets Android, iOS and Windows Phones. Only exports to iOS from a Mac.
Desktop
One way to port the game to a desktop application easily is by using Electron. Electron is a framework for creating native applications with web technologies like JavaScript, HTML, and CSS.
Electron works by creating a window browser for the target platform (Linux, Windows and MacOS) and loading a web page in it. This page will be the one used to show the game. In essence, the game code will be exactly the same, we only add Electron as a wrapper over it.
The first step to package your game is making sure everything in your game is loading locally. If you're loading any external resource, make sure to download it and link it properly. In particular, make sure the renjs.js file linked in the index.html is loaded locally and not from the CDN.
Once your game is ready for packaging, there are two easy ways to continue:
RenJS Desktop Packager: A desktop app for packaging your games for Linux and Windows in a few simple steps.
Electron Packager: A CLI tool to package your games for Linux, Windows and Mac, and tailor it to your needs.
RenJS Desktop Packager
This portable app allows you to package games without the need to install anything or doing anything weird. Just select your game directory, choose and icon and add a few more specifications and that's it. It only supports Windows and Linux (for now!), and doesn't let you configure any more properties than the ones already mentioned, but it's the easiest method if you're not very computer savvy.
The RenJS Desktop Packager App.
On the upper side of the App you can setup the Workspace directory. This directory will be where the packaged apps you create will be stored, and, as such, you need to have writing rights for this directory. You can change the workspace with the Change button, and open it in your default file explorer with Explore.
The frame under the Workspace configuration is where to fill in your game information:
Name: The name of your game, to be used in the Application Executable file.
Game Directory: The directory that contains your game. The directory should contain at least one file called index.html that will be loaded inside the window.
Window Size: The size (in pixels) of the window that will contain the game. If the size is bigger than the game, the game will usually be centered (depending on the index.html configuration). If the size is smaller than the game, scrolling bars will appear so the game can be seen in its entirety. Normally, you'll want the window size to be the same as the game size.
Start in fullscreen: If the game should start in fullscreen. Fullscreen can be toggled with F11.
Resizable window: If the window can be resized by the user or not.
Icon image: Select a png image to be used as the icon in the windows/linux app bars, and in the .exe file. If no icon is selected, the default RenJS icon will be used.
Platforms: The platforms to target in the packaging. Normally, Windows (x64) and Linux (x64). You can also select 32 bits versions of both platforms, if you want to target older computers.
When you have everything setup, you can package the game by pressing the button at the bottom. After some processing the packages will be ready and you can open the workspace directory to find them. Try and open all the packages to make sure they work properly before distributing them.
Electron Packager
This CLI tool packages Electron apps into desktop applications for Windows, Linux and Mac. The first thing to do then is to convert your game into an Electron app, that is, wrapping the game with a few more files Electron needs to create the window where the game will run. To make things easier, you can grab the RenJSQuickstart With Electron project. This project does exactly what you want to do, but with the RenJS Quickstart game.
Almost all you need to do for your game to run under this project is:
Replace the Quickstart files: replace the contents of the RenJSGame directory with your game.
Adjust Window Size: The window size of the application will adjust to your game, so you need to set up the same values from the RenJSConfig object in boot.js in the Electron wrapper. More specifically, you need to change the lines 9 and 10 in the main.js file of the Electron project with the width and height of your project.
Change the icon: If you want you can change the icon.png file for another image that will be used as an icon for the application, to show in the task bars. For window you will need to add an icon.ico file, and for Mac .icns file.
Once the project is ready, you need to test and package. For doing this, you will need to install a few tools: npm and Electron Packager, as CLI tools
Then you're almost ready. First, test that your game is working properly as a desktop app. Open a terminal and write:
# install the project dependencies
npm install
# test your game
npm start
The last command should open the game in a window just as you want it to. If it works as expected, then you're ready to package it. You need to do this for any platform that you want to target. The Quickstart project comes with a few handy scripts to package the game to the most common platforms:
# For linux
npm run package-linux
# For mac
npm run package-mac
# For windows
npm run package-win-64
npm run package-win-32
After the script is run, you'll find the packaged app in the release-builds directory. You'll notice these apps are considerably larger than your game, usually. This is because the package includes a whole web browser that will be used to execute the game in, so that there's never problems with compatibility or any need to install anything else.
Make sure you can execute the packaged apps, by opening the executable files (.exe in windows, scripts in linux), and you'll be ready to distribute it!
Mobile
Coming soon!
Can't find what you're looking for? Join us in Discord and tell us what's missing!